Wednesday, January 26, 2011

Sour Cherry Buckwheat Scone Cookies

When I moved from Arlington to Capitol Hill (near Eastern Market), it was an adjustment. While I now recognize the awesomeness that is the Hill, I had a hard time separating myself from the land of brown flip flops and infinite Starbucks (thanks for memorializing, Remy). But just days after moving into a rowhouse on 11th Street, SE, an acquaintance of Travis's who lived a couple blocks away stopped by our house bearing homemade banana muffins to welcome us to the hood (the muffin gal is now our dear friend, Judith). With that simple gesture, love for my new digs were sealed. I never got so much as a twinkie from any neighbors when I moved into my Ballston highrise.

We have since left idyllic 11th Street to become homeowners in a more "developing" section of East Capitol Hill. I use that term loosely, because our house is just a few blocks from a pretty well-to-do park...but to give you an idea, my car was stolen from right in front of our house and the corner store has 1-inch thick bullet-proof glass surrounding the register. Anyhow, despite the developing nature of the area, I know that we have some nice neighbors. I've seen them walking their dogs (and obviously dog ownership correlates positively with niceness). Embarassingly though, we know so few of them.

So when some new folks moved into the house at the end of our block, I took a cue from Judith and decided that it was our job to introduce ourselves with a welcome offering. And nothing says let's bond over the local police beat like buckwheat cookies.
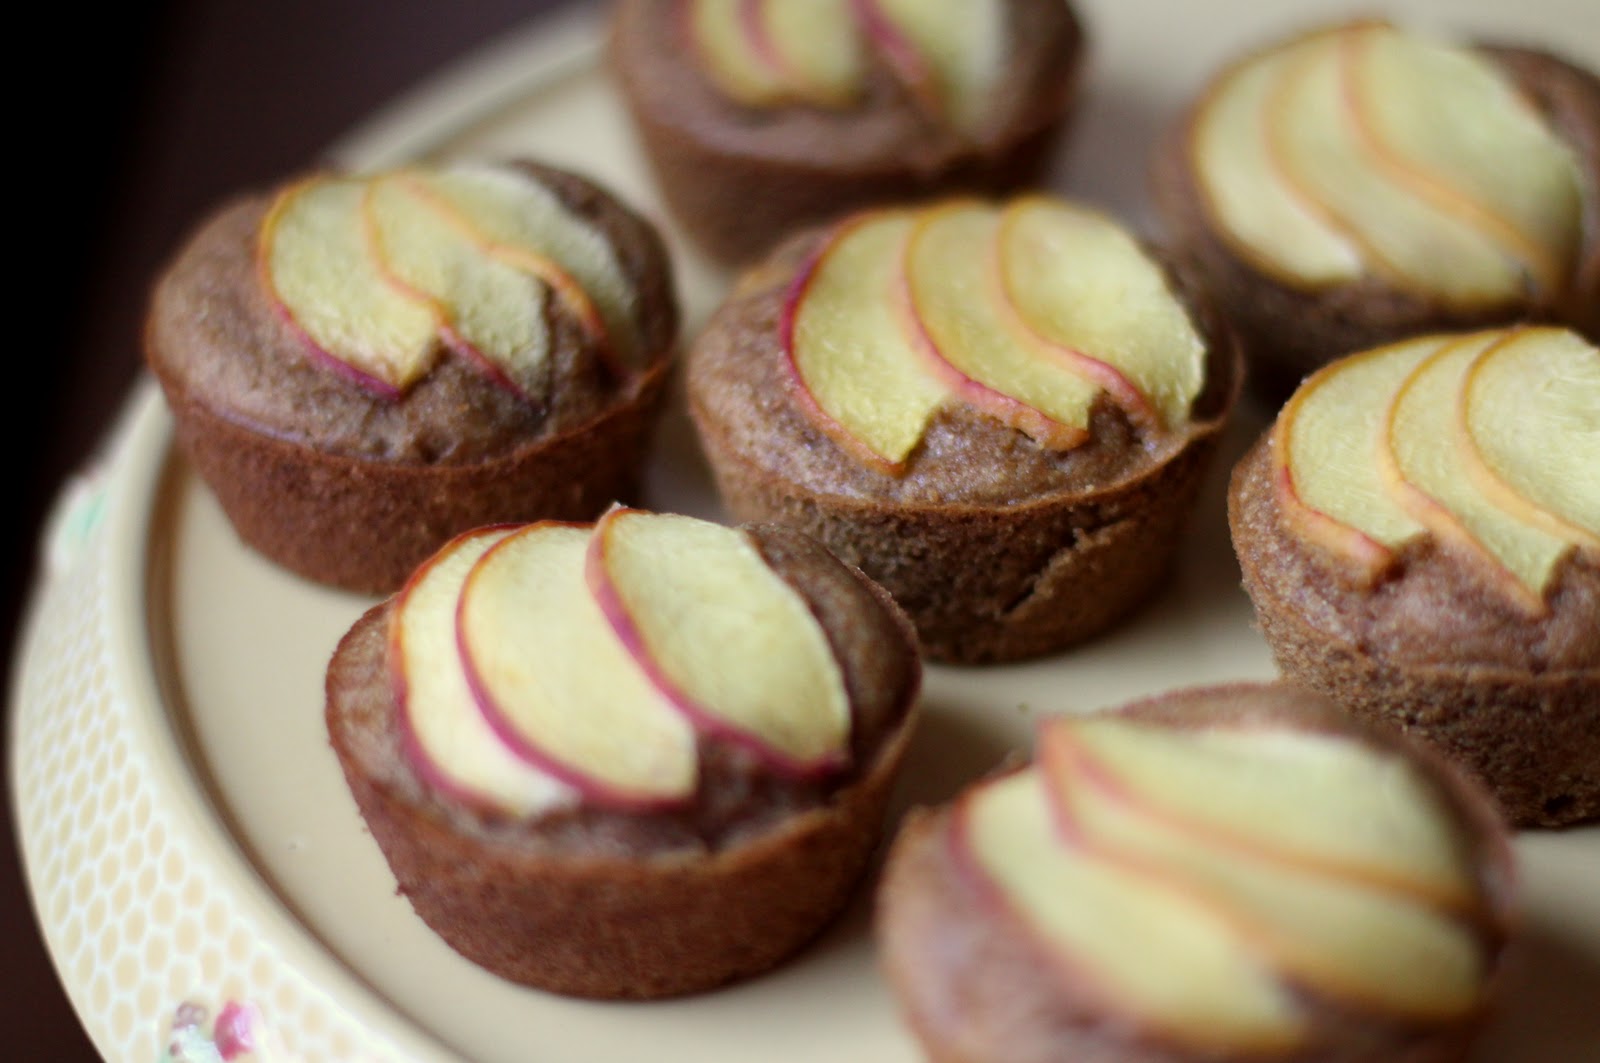
The recipe for these neighbor cookies came from the Figgy Buckwheat Scone recipe in Kim Boyce's Good to the Grain (also the inspiration for this Sweet Potato Bread, for which I've received great feedback from people who tested it in their own kitchens). I can't say the figgy scone recipe as printed was a success (the recipe starts with a somewhat complicated "fig butter" that I must have jacked up, because it tasted like I pulled it out of a sewer), but after I ditched the fig butter and tweaked the sizing, the resulting product was a super flavorful, grain-filled cookie.
If you've never used buckwheat flour, count your lucky stars for finding this post. The flavor is strong and nutty and it makes for a super satisfying cookie.  I made pretty small cookies, between 1.5" and 2" in diameter, but if you want a thicker cookie, just leave the dough a little thicker when rolling and make a shorter rectangle.

Sour Cherry Buckwheat Scone Cookies
adapted from Good to the Grain

Makes approx. 50 2" cookies

1 cup buckwheat flour
1-1/4 cups unbleached flour
1/2 cup sugar
2 tsp. baking powder
1/2 tsp. salt
1/2 cup (1 stick) butter, cold, cut into chunks
1-1/4 cups heavy cream
1 cup sour cherry preserves (or your favorite fruit preserves)

Sift or mix dry ingredients together in a large bowl. Add cold butter chunks and work into dry mixture with your fingers until the butter is broken into rice-sized pieces. Add cream and mix with a spatula until dough is incorporated. Dough is sticky and you may need to switch over to using your hands to get all the flour incorporated.

Divide dough into two even pieces. One at a time, roll each section of dough out onto a well-floured surface (keep adding flour as needed to keep dough from sticking) until you have a rectangle roughly 8" by 14" (dough will be around 1/4" thick). Spread half the preserves over the surface of the dough, then roll lengthwise into a log (so that you have a 14" log). Repeat the process with the second piece of dough.

Wrap the two logs in plastic wrap and freeze for 1 to 2 hours.
Remove logs from freezer and heat oven to 350 degrees. Slice dough into 1/4" slices and place evenly on a baking sheet lined with parchment paper or a silpat.

Bake for 18 to 20 minutes at 350 degrees. Deliver to neighbors with a smile. Smile is key.

Thursday, January 20, 2011

French Vanilla Cake w/Caramel Frosting & Brandied Pecans

Holy deliciousness. The french vanilla layers, caramel frosting and brandied pecans in this cake came together like a holy trinity of sweetness. The frosting tastes shockingly similar to the extra icing they sell at Cinnabon (yes, I've indulged in the extra icing, don't judge), and the brandied pecans are sweet and crunchy without having an overly strong, sugary coating like some pralines. The nuts would also be great served as a stand-alone snack or in any other dish that calls for sweet nuts. And as for reviews, I served this mini-cake to seven other people (plus yours truly) and got eight gold stars.

Last weekend, when my main squeeze announced he was doing a poker night with the menfolk, I decided to host a little ladies get-together at my place. So while the dudes were playin' Texas Hold-Em and slugging whiskey, we drank wine, enjoyed this tasty cake and engaged in some chicky shenanigans.

We played a charades game called "Celebrity" (also referred to as "Lunchbox" in some parts; thanks to the team effort from Phil and Laurel for suggesting!). I highly recommend it if you're looking for a game for a bigger group. It's easy to explain, works well whether the guests know each other or not and is very entertaining. (Oddly, of the hundred or so celebrities that we wrote down, there were only two duplicates - Jeff Bridges and Fabio. I'm not sure what that says about us.)
In the past, I've generally made layer cakes with 9" cake pans, and unless we're having a big party, the cake never gets finished. It's just too big for a few people to polish off and the last thing I need is extra cake sitting around our house (considering the fact that I already indulge in most of the baking rejects that don't end up being shared...). So after my friend Erica introduced me to the 6" springform (via an amazing turtle cheesecake), I became a mini-cake convert.

The recipe below is measured for a 6" cake, but if you want a bigger cake (8" or 9"), just double the recipe. Similarly, for any recipes that call for bigger cake pans, divide the recipe in half if you want a 6" cake. If you make a lot of cakes, 6" pans are a great investment. I got eight perfectly-sized slices out of this cake.

French Vanilla Cake (from misshomemade.com)
1/2 cup (1 stick) unsalted butter, softened
1 cup sugar
2 eggs, room temperature
1-1/3 cups plus 1 tbs. flour
1-1/8 tsp. baking powder
1/2 tsp salt
1/2 cup milk
1 tbs. vanilla extract

Preheat oven to 350 degrees. Sift dry ingredients together. Cream butter and sugar with an electric mixer; add eggs, vanilla and milk. Slowly add dry ingredients and continue to blend with electric mixer. Divide batter evenly into two 6" cake pans. Bake at 350 for 30-35 minutes.

OR if you want a bigger cake, double this recipe and use two 9" cake pans. Bake for 35-40 minutes.

Brandied Pecans
1/2 cup pecan halves, roughly chopped
1 tbs. brandy (bourbon, sherry, Grand Marnier would probably all work)
1 tbs. sugar

Stir brandy and sugar together in a medium bowl. Stir chopped pecan pieces into sugar mix until nuts are coated. Spread nuts onto a pan lined with parchment paper or silpat. Bake at 350 degrees for 8-9 minutes, stirring once. Be careful, these will burn FAST. Better to take them out early than late.

Let cool and break up any nuts that are stuck together.

Caramel Cream Cheese Frosting (adapted from Whisk-Kid)
1/4 cup light brown sugar 
10 tbs. unsalted butter, softened and divided (4 tbs. and 6 tbs.)
1/3 cup heavy cream 
4 oz cream cheese, softened
1/2 tsp vanilla
1/4 tsp salt
2-3 cups powdered sugar*

*My apologies, the amount of powdered sugar originally listed here was short.

Melt brown sugar and 4 tbs. butter in a saucepan over medium heat. Stir until sugar dissolves. Bring to a boil over medium heat; remove from heat. Whisk in cream until completely blended. Transfer to a heat-resistant bowl and cool to room temperature, stirring occasionally. When cooled, pour a quarter of the sauce into a ziplock bag to save for drizzling.

Cream remaining 6 tbs. butter and cream cheese in a large bowl with an electric mixer until smooth. Beat in vanilla and salt. With mixer running, slowly pour in cooled brown sugar mixture and beat until smooth. Add powdered sugar gradually, beating well after each addition until completely smooth. Chill slightly for a firmer texture, stirring occasionally.

Assembly:

To assemble cake, place one cooled cake on the plate or cake stand on which you plan to serve the cake, flat side (bottom side) down. Generously apply a layer of frosting and a layer of nuts (about 1/3 of the nuts) to the top of the first layer.

If you want to get a flat cake top, like the one pictured, using a large, serrated knife, slice the rounded top off the second layer of cake (this should be just the top few millimeters of the cake). Place the cake, cut side down on top of the first layer of cake and frosting. If you don't care about having a flat-top, skip the slicing and place the second layer on top of the first layer, rounded side up.

Frost the entire cake with a thin coat of frosting to catch any loose crumbs and fill in divots or gaps. Place cake in the fridge for 20-30 minutes so that the first coat frosting hardens. Then frost the entire cake with a generous second layer and top with remaining nuts.

Snip the tip off the reserved caramel sauce in the ziplock bag and drizzle over top of cake. Serve to friends with a nice white and side of charades.

Saturday, January 8, 2011

Tangy Peach & Pumpkin Muffins


A very long time ago, my little sis gave me a Williams-Sonoma New Healthy Kitchen cookbook called Starters. At the time, I lived in an apartment and wasn't doing much entertaining. And I didn't normally whip up "starters" for myself. But as it turned out, the book has an awesome guide to seasonal fruits and veggies (grouped by color for us visual learners) that I was able to start using right away.
Check out the pinks and reds section - so pretty! Makes me want to run out and buy some radishes.

Obviously most fruits are available in more than one season, but Starters provides suggestions as to which fruits might be best in any given season. As you can see, peaches are best in summer. And I totally agree. If I'm going to eat a peach as a handheld fruit, I like it to be really sweet and juicy, which is what you find in the summer. But wait! Peaches have a life beyond the summer!
According to the food gospel of Katie, peaches are good for use as long as they feel ripe. I have no interest in hard peaches; I don't like them one bit. But a soft peach, even if it is super-tart, can make a great addition to winter breads, muffins and tarts.

The tartness of the peaches is so perfect with the sweetness of the muffin. It's much harder to plan for tart peaches in summer, so make these now! The recipe contains cornmeal and is naturally a bit crumbly, but the crumbly muffin meshes perfectly with the big chunks of moist peaches. I reduced the sugar from 3/4 cup suggested in the inspiration recipe to 1/2 cup, but feel free to stick with 3/4 cup if you want a sweeter muffin. Whatever you do, don't skip the peach slices on top. If you're making these muffins for guests, it gives them a classy touch, but more importantly, it adds more fresh, tangy fruit to each muffin. Mmm, mmmm, mmmm.

Tangy Peach & Pumpkin Muffins

Makes 15 muffins

1 cup cornmeal
1 cup whole wheat pastry flour (or unbleached all-purpose)
1/2 tsp. salt
1 tsp. baking soda
1 tsp. baking powder
1 tsp. cinnamon
1 tsp. vanilla
1/2 cup light brown sugar (or 3/4 cups, depending on taste)
1 cup canned pumpkin
1/2 cup vegetable oil
3 eggs
1 peach, diced into chunks, plus 1 peach for slicing

Preheat oven to 350 degrees. Prepare muffin tin(s) by greasing the cups or using muffin cups. Cut your two peaches - one should be cut into chunks, the other halved and then cut into thin slices (for the slices, be sure to cut out the part of the flesh that was closest to the pit; it is usually very dry). 

Mix dry ingredients together. Mix wet ingredients together and then blend by hand into dry ingredients. Fold in peach chunks. Fill greased or lined muffin tin 2/3 full with batter. Place 2 to 3 peach slices on top of each muffin as shown in pictures above.

Bake muffins at 350 for 18-20 minutes. 

Let muffins cool on a baking rack. Warning: the smell of these muffins baking will make you want to eat the entire pan straight out of the oven. Please let them cool at least a bit so you don't burn the lining of your mouth off. This tip is with love, from me to you.

Sunday, January 2, 2011

MacGyver Snickerdoodles and a New Year


Ok, ok, ok, ok. I know we've already been in a new year for 48 hours now, but I had some other things to attend to. And in my own defense, I have accomplished more than my roommate, who has just informed me that he hasn't showered in 2011.

I would like to say that I woke up on January 1 refreshed and ready to attack the New Year. But I didn't. I rolled out of bed around noon, to be met with the task of SRSLY cleaning our disgusting floors (from a SRSLY successful NYE party) and taking down the Christmas decorations/clearing the premises of pine needle warfare. By the time I was done, I needed a nap. And now here I am on the eve of returning to what is in my opinion the saddest work day of the year (when the next mass vacation time is an impossibly distant 355 days away). Booooooo.


Last year, T and I were uber-prepared for hosting a NYE party. This year, a little less so . . . We were kind of scrambling around for things late in the game. I wanted to add another desserty item, so I did a quick inventory of the cupboards. I didn't find much in the way of good baking supplies, so I sought inspiration from my old roommate, Allison (the roommate that came before Travis, and who has probably managed to squeeze in a shower this year). This gal could bake up a treat under any circumstances and with any ingredients. I used to call her the MacGyver of baking. She probably could have produced a birthday cake out of bobby pins and duct tape.

Allison and I shared some seriously sweet teeth (read: occasional reckless abandon with respect to late night cookies and ice cream). One night we had an empty fridge and the stores were closed. Allison walked into the empty kitchen and emerged with a batch of the most delicious snickerdoodles I had ever tasted. Then we enjoyed some reruns of Paula Dean while gobbling cookies. That day, she became my baking hero.


Allison had always used a red, spiral bound Betty Crocker cookbook, so I did my best to locate the old Crocker classic.
The cookies were a snap and a big hit at the party. And although I'm not posting a recipe for these little babies (because as you know, my cupcakes often come from a box), I couldn't resist sharing a photo of the lone survivor of 2010. Happy New Year, friends. 

Snickerdoodles
adapted from Betty Crocker

Makes around 50 cookies

1-1/2 cups sugar
1 cup (2 sticks) butter, softened
2 eggs
2-1/2 cup unbleached flour
2 tsp. cream of tartar
1 tsp. baking soda
1/4 tsp. salt
1/4 cup sugar (for rolling)
2 tsp. cinnamon (for rolling)

Preheat oven to 400 degrees. Cream butter and sugar with a mixer in a large bowl. Mix flour, cream of tartar, baking soda and salt in a separate bowl. Add dry ingredients to wet ingredients and continue to mix until dough forms.

Mix 1/4 cup sugar and cinnamon in a small bowl. Shape dough into 1-1/4 inch balls. Roll balls in sugar-cinnamon mix until completely covered. Place dough balls 2 inches apart on a baking sheet lined with parchment paper. 

Bake for 7-10 minutes at 400 degrees. Note: putting raw cookies onto a cookie pan that has already been in the oven will cause the cookies to bake a little faster, so be aware that the second, third, etc. batches may cook up more quickly.
Related Posts Plugin for WordPress, Blogger...