Monday, December 17, 2012

Apple Tart with Apricot Glaze

EZ dezzert in the hizzzooooouzzz. True story. So easy in fact that I got the recipe simply from a verbal exchange with one of my co-workers. She's always telling me that she's not a baker, but then she'll mention some tasty treat she whipped up for her family, so I'm not convinced. She said she makes this divine apple tart as follows: slice up apples and toss in sugar, spread out over a puff pastry, bake at 400, then brush with an apricot/water glaze. Bing, boom, bam. Gorge dessert done. Ooohs and aaahs to follow.
I questioned the simplicity of the whole thing, so I ran home and looked up thirty recipes to confirm that these instructions would result in legit dessert. Confirmed. There are lots of little tweaks in different recipes, but the main idea behind an apple tart remains the same. Spread some sugared apples out over puff pastry and beauty ensues. (Of the various tweaks, I chose to add an egg wash step because I like a shiny, sugary pastry crust.) Puff pastry is not for everything (one time I swapped wonton wrappers, which are super-duper thin, for puff pastry in an appetizer recipe - that was bone-headed and resulted in a big mess). But for many recipes, puff pastry is one of those secret weapons that makes it look like you got skills in the kitchen, when all you did was slice open a frozen package.

The flavor of this dessert is definitely on the rustic side. It's not rich or decadent. But the apples are packed tightly, so there's nothing flimsy about it. It's sweet and fresh, and leaves no want for satisfaction. It's a perfect choice for a holiday dessert that looks impressive, but won't take much time in the grocery store or the kitchen.

Apple Tart

1 sheet frozen puff pastry (standard packages are 17.3 oz. and contain 2 sheets)
3 medium apples, peeled and sliced
3/4 cups brown sugar
1 tsp. cinnamon
1/4 tsp. salt
1 egg (for egg wash)
sugar for sanding
3 tbs. apricot preserves
1 tbs. water

Let puff pastry thaw for 20 to 30 minutes. Unfold pastry onto a pan lined with parchment paper or a silicone baking sheet (like silpat), trying to avoid cracks down the folds. If pastry cracks, just press back together with fingers. Using a fork, poke holes all over the puff pastry except for the outer 1 inch perimeter. 

While pastry thaws, preheat oven to 400 degrees. Peel the apples and slice thinly. Stir together brown sugar, cinnamon, and salt. Toss apple slices thoroughly in sugar mixture. Leaving a one-inch perimeter around the puff pastry, line apple slices tightly together on the puff pastry. Edges of apples will overlap. Leave any excess liquid from apples in the bowl. 

Crack and whisk the egg, then brush the egg over the 1 inch perimeter of the pastry. Sprinkle pastry with sugar. 

Bake tart for 18-20 minutes or until crust is browned (use lower shelf in the oven). 

Once tart is finished baking, heat apricot preserves and water together over medium heat until a glaze forms (this will only take a couple minutes). Brush apricot glaze over tart while still warm. Display artfully for your adoring guests. 

Tuesday, October 30, 2012

Peanut Butter Sandwich Cookies - Disaster Rations

Sooooo, the truth is, I made these cookies strictly for blogging purposes. But then Hurricane Sandy rolled in, so I redesignated them disaster relief cookies. Today I'm bringing you peanut butter sandwich cookies à la Nutter Butters. Warning, these are decadent. Every sandwich cookie is two 2" cookies plus filling. Don't say I didn't warn you.
 
I live in Washington, DC, and from what I can tell, our area was spared the kind of devastation experienced in New England, NYC, NJ and the Delaware beaches. According to news reports, DC experienced fewer power outages than expected (and since my power lines are underground, we almost never lose power), though I imagine there is damage from downed trees. We saw a humongous (seriously, so huge) tree down in the Trinidad neighborhood that amazingly fell down the center of the street and not onto any houses or cars. Sandy did result in two days off work for many folks in the Capitol area, so on Monday I packed up the PB sammie cookies and headed over to some friends' house to pass the time with German board games and leftover Halloween beer. 

If you like Nutter Butters, or even if you don't, you will dig these cookies. They are buttery and crumbly and wickedly good. I started with a Martha Stewart recipe and basically followed it, except that she called for rolling the dough out and cutting the cookies with a cookie cutter. That was more work than I was interested in (especially because this dough is pretty delicate). So I rolled the dough into a log and sliced cookies. This is super easy and still results in nice uniform circles. One thing I wish I had done was cut the cookies a little thinner. Because the dough is delicate, cutting thin cookies is a little tricky, but try to cut slices 1/4" or thinner. 

Martha also instructs that you toast the oats before adding to the cookie dough. I have never toasted oats and couldn't decide whether it seemed worth it. In the end, I toasted the oats and I'm glad I did. They make your house smell great and the process was actually pretty easy. Did it change the flavor/texture of my cookies? Unknown. I have the feeling if you want to skip the toasting, you'll be fine. But if you have the time (10 extra minutes), toast those oats.
 
These cookies are definitely a special treat and not everyday cookies. I recommend them if you want to make a good showing at a cookie exchange or as a holiday gift . . . or I guess if you are stuck inside during a hurricane. Or, for a less intense peanut butter experience, skip the filling and just serve the peanut butter cookies in non-sandwich form. Enjoy and stay dry. 

Peanut Butter Sandwich Cookies
adapted from this Martha Stewart recipe

Makes 15 sandwich cookies (or 30 single peanut butter cookies)

1 stick plus 2 tbs. unsalted butter, room temperature
1 cup uncooked oats (old fashioned or quick cook)
1 cup plus 2 tbs. unbleached all-purpose flour
1 tsp. baking soda
1 tsp. salt
1/3 cup sugar
1/2 cup brown sugar (light or dark)
1/2 cup crunchy peanut butter

Filling:

3/4 cups creamy peanut butter
4 tbs. butter, room temperature
1/4 cup confectioners sugar
1/4 tsp. salt

Also need: wax paper

Optional (toasted oats): Melt two tablespoons of butter over medium heat in a large frying pan. When butter is melted pour oats into pan and stir. Continue to stir as oats toast for 8 to 10 minutes. Oats should start to turn a light brown. (If you're short on time, you can skip this step - use untoasted oats and omit 2 tbs. of butter.)

Whisk or sift together flour, baking soda, and salt. Stir in toasted oats.

Using an electric mixer, cream 1 stick of room temperature butter and the sugars together. If you forget to let butter get to room temperature, microwave the stick for 5 seconds on each side. Mix in peanut butter.

Slowly add dry ingredients and continue to mix until all wet and dry ingredients are blended. The dough will remain crumbly (it won't be a solid ball of dough). Pour dough out onto wax paper on a flat surface. Using your hands, form dough into a log, 2" in diameter. Wrap wax paper around the log and refrigerate for 30 minutes. 

Preheat oven to 350. Remove chilled dough and slice 1/4" cookies. If dough crumbles at all, just mold back together with fingers. Bake cookies on a silpat or piece of parchment paper for 10-11 minutes.

Filling: While cookies bake, prepare filling. Using an electric mixer, blend together all filling ingredients. When cookies are cooled, spoon about 1 tablespoon of filling onto a cookie and top with another cookie (or use a piping bag to place filling onto cookies). 

Keep cookie sandwiches refrigerated. 

Monday, October 22, 2012

Butternut Squash & Apple Soup

Or maybe I should call it apple & butternut squash soup. Because it's applicious. I think that's why I love it so much. The ratio of squash to apples is about 2:1, which results in a pretty sweet soup. Not dessert-sweet, but a really warm, delicious blend of sweet and savory in a single soup. Yum. Yum. So perfect for the season.
I started with an Ina Garten recipe, but I changed the ingredient amounts a lot (in fact, I have a hard time imagining how her recipe works with so little liquid and so much squash). But she's got the ingredients spot-on - the magic comes from using apple juice or cider instead of just water or stock (note: I've used both apple juice and cider and couldn't tell a difference between the two). The one other change I made is to swap vindaloo seasoning for the curry that Ina called for. 

This recipe is super simple and only calls for one spice (besides salt and pepper) - curry. There's loads of different kinds of curry and if you have one you really like, use it here. But if you can get your hands on some vindaloo spice - which is a blend of spices, including curry, peppers, garlic, ginger, mustard and sweeter spices like cinnamon, cloves and cardamom. Think of it like a jerk rub or pumpkin pie spice - it's not a singular herb or spice, but a whole blend of dry ingredients. Vindaloo is a dish (e.g., "chicken vindaloo" that calls for all of the aforementioned spices), and I don't know how common it is to find vindaloo seasoning in a jar. I have this Penzeys vindaloo. See what you can get your hands on, otherwise use curry or make up your own blend based on the spices you like. 

The reviews for Ina's recipe (with 2 tablespoons of curry) were mixed. Some said the curry flavor was too powerful and some said it wasn't strong enough. Try to think about your own curry threshold and adjust the amount of curry accordingly (stick between 1 and 2 tablespoons). If you do find vindaloo, 2 tablespoons is good.  
In this soup, I like to reserve half of one of the apples to add after the soup is blended (which requires some additional time on the stove for the apples to get tender). This gives the soup some nice texture. If you don't have time, just add all the apples together. 

For another short-cut, check your grocery store for pre-cut butternut squash. You can find it in the produce section. And don't be afraid to use frozen squash. I've found that with soups, generally, you can't go wrong. Heat up some veggies and fruits until tender and then blend away. 

Butternut Squash & Apple Soup
Adapted from this Ina Garten recipe

Makes 5 servings

1 tbs. unsalted butter
2 tbs. olive oil
1 large yellow onion, chopped
2 tbs. your favorite curry or vindaloo 
2 lbs. cubed butternut squash (about 5 cups)
2 large apples (Granny Smith recommended), peeled and diced (1/2 diced apple reserved)
2 tsp. salt
1/2 tsp. black pepper
2 cups water
2 cups apple cider or apple juice (1 cup reserved)

Heat butter, olive oil, onions and curry/vindaloo in a large pot, uncovered on low heat for 20 minutes. Stir occasionally. Onions should be tender.

While the onions cook, peel and dice your squash and apples. Add squash, 1 and 1/2 apples, salt pepper, water and 1 cup of cider/apple juice. Bring to a boil, cover, and cook over low heat for 40 minutes. Using an immersion blender, blend the soup contents. Add remaining 1 cup of cider/juice and remaining diced apples. Cook over low heat for another 20 minutes to let the apples get tender.

If you're short on time, add all the apples up front. 

Sunday, July 22, 2012

Butterscotch Blondies

Does anybody go to Ruby Tuesday anymore? Or is that passé? Cuz back in the day, RT served the BEST blondie sundae. When I was a kid, sometimes my family would go to the $1.50 cinema and then have dinner at Ruby Tuesday or the looooong-defunct Peppermill. I'm nearly certain $1.50 cinemas are now things of legend (correct me if I'm out of touch), but I know that Ruby Tuesday is alive and well. And since Ruby's was my introduction to the concept of a "blonde" brownie (or more accurately, a cookie bar), I feel like I owe it a shout out. 
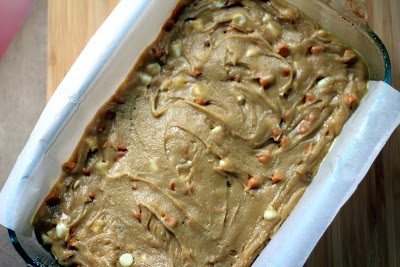
Yesterday evening, we were headed to a friend's house for drinks and I was asked to "bake something." But really, pre-drinks, all I wanted to do was sit around and watch my recording of the Project Runway Season 10 premiere. Have no fear(!), these blondies are quickies when it comes to prep time, so I had time for both baking and the runway. Literally, if you have the ingredients, the prep time is 15 minutes, 10 if you put your mind to it. And they are SO. SO. YUMMY. 
I baked these blondies for 23 minutes and that was just barely long enough. I like my cookie products on the underdone side, but these probably could have used another minute or two. Bake to your liking. Also feel free to use any combination of chips/nuts that you like to have in your cookies (stick to a total of around 1 or 1-1/4 cups of add-ins). This recipe is pretty much a blank canvas for whatever you want to put in your blonde cookie bars. And it's such a great go-to when you're short on time. Or if you can't make it to Ruby Tuesday for your blondie fix.

Butterscotch Blondies
makes 15 bars (9"x13" pan)


1.5 cups unbleached, all-purpose flour
1 tsp baking powder
1/2 tsp salt
1.5 cups light brown sugar 
1 stick + 3 tbsp unsalted butter,melted and cooled 
2 eggs
1.5 tsp vanilla
1/2 cup butterscotch chips
1/2 cup white chocolate chips


Preheat oven to 350 degrees. Sift or whisk together flour, baking powder and salt. Set aside. Stir together brown sugar and butter. (Make sure butter is not hot - you don't want to add eggs to a hot mix.) Stir eggs and vanilla into butter/sugar mix.


Stir dry mix into wet mix, just enough make sure all flour is incorporated. Fold in butterscotch chips and white chocolate chips.


Spread dough into an ungreased 9"x13" pan. Bake at 350 for 23-26 minutes. Enjoy warm or add vanilla ice cream and caramel sauce for a Ruby Tuesday throwback!

Sunday, March 18, 2012

Luck O'the Irish Soda Bread

I just started a new job. I used to work in the private sector and now I work for the federal government. Mostly, the switch has been awesome. Better hours, more responsibility, and overall, work more suited to my interests. But I'll tell you, I might have been a little spoiled by certain things from the old job . . . Previously, I had 24-hour access to a free coffee/tea machine with loads of flavors (including cappuccino!). Not anymore (good news, taxpayers, you don't pay for my daily tea). Plus, the kitchen had an endless supply of paper goods and plastic utensils. No dice on kitchenware in the new place. Seems like no big deal until you bring a salad for lunch and have to travel ten floors to pilfer a fork from the cafeteria. Who knew I would feel so sentimental about a drawer full of forks?  
The good news is that I can already tell that despite the dearth of free coffee and disposable flatware, the kitchen congeniality carries over, even to the government. Floormates will leave extra cake or cookies for communal consumption in the kitchen - a good sign about the folks that I'll be working near. On the whole, I feel extremely lucky to be in my new job, both because of the substantive work and the general atmosphere of the office. 

At my old office, just about a year ago (right after St. Patrick's Day), someone brought in a loaf of Irish soda bread and left it in the kitchen to share. The bread came from the Heidelberg Pastry Shoppe, a pretty well-known bakery in the DC area. It was addictively tasty. Specked with raisins and just barely sweet - you know, sweet enough to nearly curb a pastry craving, but not so sweet that you feel guilty for having two slices. I was so into to it, that at the end of the day, I peeled the ingredient sticker off the plastic bag that the bread came in so that I could try to recreate it. Then I promptly forgot about it until this year when I saw soda bread advertisements leading up to St. Patty's Day.

So I pulled out the old ingredient sticker and Googled some soda bread recipes. It turns out that there are basically two types of Irish soda bread - the traditional Irish style, which is not sweet and does not have caraway seeds or raisins, and the American version, which I described above. I definitely wanted to make the sweetened American version, the recipe for which is pretty standard. 
Making this bread is super simple, you just need to take care not to overwork the flour. Because the dough is very dry, it is tempting to overly work it. Gently work the dough bits together until it forms a ball - nothing further. There will still be some dry flour bits in the ball and probably a little leftover flour on your work surface. Refer to the photos for reference. 

Irish Soda Bread (American style)

3 cups unbleached, all-purpose flour
1 cup cake flour
1/4 cup sugar, plus sugar for sprinkling
1.5 tsp salt
1.5 tsp baking soda
1.5 tsp cream of tartar
1 tbs caraway seeds
4 tbs butter cold, plus 1 tbs for melting
1 cup raisins
1.5 cups buttermilk
1 egg

Preheat oven to 425 degrees. Sift or mix together all-purpose flour, cake flour, sugar, salt, baking soda, cream of tartar and caraway seeds. 

Add 4 tbs. butter with a pastry cutter or your fingers. Break up butter until all of the butter pieces are smaller than pea-sized. Once the butter is worked in, the mix will still be completely dry (so don't worry if you don't have "dough"). Add raisins. 

Whisk buttermilk and egg together in a separate bowl and then add to dry mix and stir very gently - just enough to incorporate the liquids. Dough will be lumpy pieces. Dump dough bits onto a clean, flat work surface. Using a bit of extra flour, gently roll and press the dough bits together until you have a ball. Again, do not heavily knead the dough. Just enough to get a ball. See the photos above for dough phases.

Once you have a ball, place the dough either on a flat pan or any oven-safe skillet at least 10" in diameter. Using a serrated knife, score the dough by cutting a shallow "X" across the top of the dough (see picture). Make sure cuts are no more than 1/2 inch deep (if you cut too deep, don't worry, you'll just have a big split in the top of the bread - mine was a little too deep).

Melt 1 tbs. of butter and brush across top of dough. Sprinkle buttered dough with sugar (for sprinkling, I like using turbinado or demarrara sugar, but plain sugar is fine). 

Bake dough at 425 degrees for 40-45 minutes. Top of bread likely will be fully browned after 30 or 35 minutes so place a piece of aluminum foil loosely over the top of the bread at that time. Test center of bread with a butter knife or your finger to make sure it is fully cooked. Center of the bread should be firm, and not mushy at all. 

Bread stores well in an airtight container at room temperature for several days (or freeze). 

Happy belated St. Patty's Day and here's hoping you have your own bit of good luck this week. 
Related Posts Plugin for WordPress, Blogger...