Monday, December 27, 2010

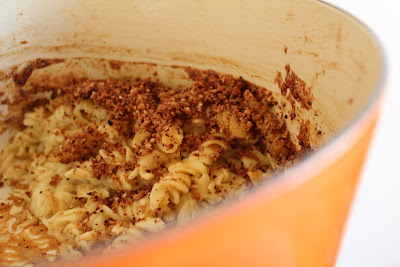
Cupboard Mac & Cheese with Brie, Fontina, Goat and Cheddar


I hate wasting food. A lot. I think sometimes Travis is appalled by my attempts to salvage food in our house when, ahem, perhaps a bit too much time has gone by. But groceries are so expensive in DC, I just can't stand not using them. 

For various reasons (holiday entertaining; my own weakness at fancy cheese counters), we had several partial blocks of really good cheese left in our fridge that I knew weren't going to get eaten. So when it was time to cook something for an afternoon Christmas get-together, I decided that I would try to make mac & cheese using the items I already had in my house, namely the aforementioned cheese.

The bulk of the cheese we had was brie and fontina, neither of which is typically used in baked macaroni and cheese. They are both mild and on the sweet end of the cheese spectrum (at least, the generic, unaged versions), whereas most mac & cheese recipes call for stronger, sharper cheeses (e.g., cheddar, Monterey Jack, Parmigiano-Reggiano). My mom always told me that a really good cheese will make your toes curl, but I think that only applies to sharp cheeses. A delicious brie might make your heart flutter, but it won't curl your toes. So I knew I would need to dress the cheeses up with a little something extra. Like my favorite white wine and some fresh rosemary.


Be aware that even though I dressed it up with rosemary and wine, this is a mild dish that is not super rich. I have a recipe for a very decadent mac & cheese that calls for no less than 1 quart of whole milk or cream and 6 tablespoons of butter - this is not that mac & cheese. But it is a really delicious recipe if you are looking for a lighter flavored, but still comforting macaroni. 

I brought the mac & cheese as a side dish for a hearty chili dinner with some of Travis's friends from grad school, which the host, Jenny, affectionately refers to as the "Michigan Family." (Her kids are in fact the first children to ever call me an "auntie"!) The Michigan Family recently got a new addition, baby Logan (he's the redheaded cutie with Angelina Jolie lips below), so we had lots to celebrate! 

Among other things to celebrate at the close of this year was the end of Jenny's countless surgeries as a result of a double mastectomy and subsequent reconstruction. She is a two-time breast cancer survivor and has the most amazing attitude you can imagine. At one point over dinner, she recounted the Single Girls' Apple Pie, and jokingly said "What does it take to get a blog entry about my tragedy?!" I'm working on something good, girlfriend.


And because the growing brood of kiddos really adds to the flavor of a Michigan Family gathering, I couldn't resist sharing a few photos. This is the face of a kid who is not interested in mac & cheese until he has downed some chocolate.

This is also the face of a kid who is not interested in mac & cheese. Because he has no teeth. Look at that little mouth - it doesn't get any cuter.

This one's a future blogger. She had some thoughts on my content.

And this one schooled me in grammar.

I've called this dish "cupboard" mac & cheese to encourage you to make use of whatever pasta/herbs/cheeses and half bottles of wine you've got around your house. I promise, you can't screw up noodles baked in melty cheese and good wine.

Cupboard Mac & Cheese

Serves 8-10 as a side
  • 12 oz. pasta of your choice (suggested: rotini, fusilli, or gemelli)
  • 1 large or 2 small slices whole wheat sandwich bread
  • 1/3 cup walnuts and/or pecans (if you want to skip the homemade breadcrumbs, swap in 1/2 cup bread crumbs for the sandwich bread, nuts and 1 tbs. butter)
  • 2 tbs. butter, divided (1 tbs./1 tbs.)
  • 1 tbs. olive oil
  • 2 cloves garlic, chopped
  • 1 tbs. chopped rosemary (fresh if you have it - we have a very overgrown rosemary bush in our yard)
  • 1/2 cup of your favorite white wine (I used Sauvignon Blanc)
  • 2 tbs. whole wheat flour 
  • 1 cup milk (I used skim)
  • 4 cups of shredded cheese (I used roughly 1 cup bleu goat cheese, 3/4 cups cheddar, 1-1/2 cups brie, 1-1/4 cups fontina)
  • 1 tsp. kosher salt
  • pepper to taste

Preheat oven to 350 degrees. Tear wheat bread into large chunks and place in a food processor; pulse several times until mostly crumbly. Add nuts and continue to process until ground into crumbs. Melt 1 tbs. of butter in a large skillet. Toss crumbs into skillet and toast for 5-7 minutes, stirring often. Or, use pre-made breadcrumbs as noted above.

Cook pasta according to directions for al dente consistency. Usually 8-10 minutes. Drain and set aside.

Heat up olive oil and 1 tbs. butter in a large pot. (If you have an oven-safe pot, use it, so that you can go directly from stovetop to oven.) Saute chopped garlic and rosemary in the hot butter/oil for 2-3 minutes at medium heat. Reduce heat and slowly add wine (turn on your fan, because it will smoke a little). Let the wine heat up and then add flour. Turn heat back up to medium and stir until the mixture thickens. Add milk and stir for a few more minutes. Add cheese, salt and pepper; stir until melted. Add cooked pasta and stir.

Top with toasted breadcrumb mix. Bake for 30-35 minutes.

Wednesday, December 22, 2010

Cookie Party v.2.0 - Frosted Sugar Cookies


For the past several years, my friend Kristi has thrown a cookie making/decorating party for the ladies of Capitol Hill. And let me tell you, when it comes to throwing a cookie party, this girl is a veritable Martha Stewart. She orders adorable invitations (remember those? before evites?), prepares the cookie dough in individual portions, whips up loads of different colored icing in piping bags, has more cookie cutters than probably Martha herself and just generally knows how to make people feel welcome (usually with warm drinks and fudge). Last year, I braved one of the worst storms in DC history just to make it to Kristi's cookie party.

Since last December, however, Kristi has - gasp - moved off the Hill (i.e., out of the Capitol Hill neighborhood). In all fairness, it was Kristi's first chance to live with her new husband, who had been either deployed or stationed out of town until then, so we don't blame her. In any event, since everyone else still lives on the Hill, this year she asked if I would co-host by having the party at my place so that people wouldn't have to travel as far. No problem . . . but could I live up to the legend? Just kidding. I didn't have to live up to anything except a clean house, because Kristi still handled everything (she's a great co-host!). 
I did make some delicious mulled cider and shared my 4 holiday cookie cutters.

In past years, everyone would get a mound of unrolled dough, but this year, Kristi decided to roll out the dough in advance and store it in the fridge between parchment paper. She gets more advanced every year.

Erica brought this fancy-pants decorating sugar that I LOVED. I had to refrain from pouring it all over every single cookie.

Look at that smile on Laura's face! So fun right?

Until it turned into a cookie making sweat shop. Kristi may think twice about having it at my house next year.
Kirsten was churning them out like a pro.

Laurel made a sheriff's badge for her boyfriend Phil who likes to think he's in charge. (Not really, but looks like it, right?)

Suzanne brought the newest addition to their family, Beck, who was a perfect little angel the whole afternoon. He even assisted with some of the more detailed cookies.

Snowman on steroids?

Amy took a more minimalist approach (she's a doctor for goodness sake - they don't have time for frills).

Some beautiful finished products from the cookie party queen herself.

Since I didn't make these cookies, I don't have an official recipe to share, but I have picked up some pointers watching Kristi over the years. She starts with the "No Fail Sugar Cookies" recipe, which is praised by bakers across the internet (though I know she has also eyeballed the Alton Brown recipe, which is slightly different). Recipe is as follows for 4 to 5 dozen cookies:

This is a big batch, even for a standard Kitchenaid mixer. You may want to mix the dough in two halves.

6 cups flour
3 tsp. baking powder
2 cups butter
2 cups sugar
2 eggs
2 tsp. vanilla extract 
1 tsp. salt


Cream butter and sugar until light and fluffy. Add eggs and vanilla. Mix well. Mix dry ingredients and add a little at a time to butter mixture. Mix until flour is completely incorporated and the dough comes together.

Put a handful of the freshly made dough between two sheets of parchment paper and roll to desired thickness. Repeat with the rest of the dough. Put the rolled dough, including the parchment paper, on a cookie sheet and refrigerate for 1 to 2 hours.  

Immediately out of the fridge, cut dough into shapes with your favorite holiday cookie cutters (if the dough is sticking, it has gotten too warm; put it back in the fridge for a bit). For intricately shaped cookies or for dough that has gotten warm, place tray of cookie shapes back in the fridge before baking (otherwise your cookies will spread and lose their shape in the baking process). The key to success in every step is cold dough!

Bake on ungreased baking sheet at 350 degrees for 8 to 10 minutes or until just beginning to turn brown around the edges. 

Icing: I'm not sure how Kristi prepares the icing. It's top secret. But the standard recipe for royal icing, the kind that will harden on your sugar cookies, is as follows (from Alton Brown):

3 large pasteurized egg whites
1 tsp. vanilla extract 
4 cups confectioners' sugar 
gel paste food coloring

Combine egg whites and vanilla with a mixer until frothy. Add confectioners sugar gradually and mix on low speed until sugar is incorporated and mixture is shiny. Turn speed up to high and beat until mixture forms stiff, gloss peaks (5 to 7 minutes). Add food coloring, if desired. Transfer icing to ziplock bags or closed tip pastry bags so that you can keep the icing from the air until ready for use (air will cause the icing to harden). Icing can be stored in refrigerator for up to 3 days. If using pastry bags, fold ends over tightly and store in airtight container. When ready for use, snip the corner and pipe onto cookies.

For thinner icing that will coat or "flood" the cookies more easily, add extra water to the icing before storing in pastry bag, or spread icing on cookies with a knife that has been dipped in water.

OR (if you're not cool with raw eggs or have pregnant ladies in attendance):

3 tbs. meringue powder
1 tsp. vanilla extract
4 cups confectioners sugar
6 tbs. warm water
gel food coloring

Using an electric mixer, beat the confectioners sugar and meringue powder until combined. Add water and beat on medium to high speed until very glossy and stiff peaks form (5 to 7 minutes). If necessary to get the right consistency, add more powdered sugar or water. Add food coloring and follow same storage directions as above.

Friday, December 17, 2010

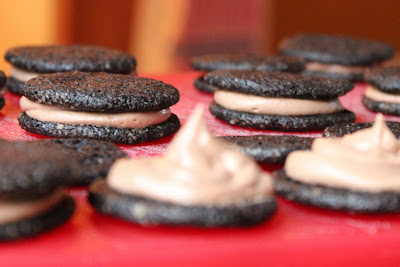
Cookie Party v1.0 - Homemade Mint, Hazelnut & Vegan PB Oreos


As we've established, I'm a blogger now. Bloggers do weird things like be friends with each other even when they've never met. Weird, but also very sweet. As I learned this past weekend, Washington, D.C. has quite the cache of young, female bloggers who share a common interest in food, photography, healthy living, exercise and obsessive compulsive behavior (I kid . . . sortof). 

One such gal, Lisa, was very graciously opening her home to local bloggers for a cookie swap. My first thought: "That is so cool, I totally want to be a part of that! Gepetto, make me a real blogger!" My second thought: "Hold your horses, cowgirl, you don't know any of these people. Stick to what you know." I felt kind of like a weirdo inviting myself to a party at someone else's house where I wouldn't know another soul, buuuuuut, what the hell. I decided it would be good to get out and meet some new people.

I tried to explain the situation to a guy I work with, and it led to some second guessing:

       Katie: "Guys, I'm going to a party with other DC bloggers that I've never met to exchange cookies!"
       Co-worker: "Were you invited to this party?"
       K: "Not exactly."
       CW: "Do you know the host?"
       K: "Mmm, no."
       CW: "Are you going with some who knows the host?"
       K: "N-n-n-o-o." (Deflated voice; no more exclamation points.)
       CW: "Kathryn, will you know anyone at this party?"
       K: "No."
       CW: "I don't get it."
       K:  :(

And so, by the time the cookie party rolled around, I was feeling a little nervous. Maybe this really was a ridiculous idea. Plus I had caught cyberwind of what some of the other bloggers were making and was feeling inadequate. Originally, homemade oreos sounded so wonderful, but when I heard some of the fancy names of other cookies, oreos seemed kind of pedestrian. But at that point, I had all the ingredients for oreos plus two other events to prep for over the weekend. No time for changing plans.


Prepping for the party was kind of like getting ready for a first date. You don't know the person you're meeting, you want to make a good impression, you're crossing your fingers alcohol will be readily available and you try to plan for an easy exit in case it's a disaster. This, however, was a date with 20 other women. Way. More. Intense.

Fortunately, there was nothing intense about the situation at all. Everyone was amazingly nice and complimentary and funny. Most of the other people were in the same boat as me and didn't know any of the other guests. And it was really neat to talk to so many other bloggers.  

And the cookies, WHOA. Let's just say everyone brought their A game. I wish I had taken notes on who brought what, but see above re feelings of nervousness - I was not in a mental position to plan for note-taking. I do remember that Chase brought my absolute favorite kind of cookies, Italian pizelles (made without anise - not the traditional Italian method, but just the way I like them!). Clearly, we were instant friends.


Talk about crafty! These tree cookies were like little works of art.
I do remember that above and below were made by the host and co-host, Lisa and Emily. Both delish.

And for the record, my oreos were big hit (I think the pretty packaging helped). I served them at room temperature for the party, but these cookies are best eaten when frozen or thawed for 10 minutes or so (this also keeps the frosting from squishing out the sides when eaten).

*My apologies: I had originally posted the recipe for a very large batch of these wafer cookies, which makes a LOT of dough. More than my food processor can handle. Corrected measurements below.

Homemade Oreo Cookies

Makes 28-30 sandwich cookies

Chocolate wafers adapted from Smitten Kitchen's icebox cupcakes (vegan substitute ingredients in parens)

3/4 cups unbleached all-purpose flour
3/8 cup unsweetened cocoa powder (use dark cocoa if you can find it)
1/2 cup plus 1 tbs. sugar (v - vegan sugar)
1/8 tsp. salt

1/8 tsp. baking soda
7 tablespoons unsalted butter, slightly softened (v - Earth Balance Vegan Buttery Sticks or similar product)
4 tsp. milk (I used skim) (v - plain soy milk)
1/2 tsp. vanilla extract

turbinado or demerara sugar for rolling (v - vegan sugar)

Combine flour, cocoa, sugar, salt and baking soda in a food processor and pulse until mixed. Cut butter into chunks and add to processor. Pulse until incorporated (it will look like little chocolate crumbs). Mix the milk and vanilla together in a small bowl and add to the processor while pulsing. Continue to pulse or run the processor until the mixture forms a ball (keep pulsing, it will happen).

Roll the ball out into a log around 14 inches long. Roll the log in turbinado or other large sugar crystals until coated. Wrap the log in wax paper or foil and refrigerate for an hour or so (longer is fine; I left mine overnight).

Preheat oven to 350 degrees. Slice log into 1/4 inch thick slices and place on a baking sheet. The cookies will spread, so do not place too closely together. Bake for 10-11 minutes. Cookies should get crispy as they cool. 


Frostings:

A foreword on frosting: I do not measure frosting ingredients (though I do my best to provide estimates for you). For add-ins like hazelnut and peanut butter, I just add until tasty. I do the same with the powdered sugar. More sugar here would probably serve the purpose of making the frosting very thick, like real oreo creme, but I prefer the taste with less sugar. Also, if you are working with an organic powdered sugar, you really must sift the sugar or put it through a mesh strainer before using (for some reason the organic kinds are clumpier).

Each recipe below is enough for one batch of wafer cookies from above.

Hazelnut (this was so outrageously yummy)
6 tbs. butter
3 tbs. cream cheese
1/3 cup hazelnut spread, such as Nutella
2 to 3 cups powered sugar
splash milk
1/2 tsp. vanilla extract

Mix butter and cream cheese with a hand mixer. Add Nutella, milk and vanilla; mix. Blend in powdered sugar slowly.

Mint
See recipe from Mint Oreo Cupcakes. Divide batch in half.

Vegan Peanut Butter
1/2 cup (1 stick) Earth Balance Vegan Buttery Sticks
1/4 cup natural peanut butter (I like Smucker's because it is thicker than most brands)
2 to 3 cups powdered sugar
splash of soy milk
1/2 tsp. vanilla

Mix butter and peanut butter with a hand mixer. Add milk and vanilla; mix. Blend in powdered sugar slowly.

Assembly: Fill a quart sized ziplock bag with your frosting of choice and snip off 1/2 inch of the tip. Pipe generously onto one wafer cookie and top with a second wafer cookie. Serve after freezing or refrigerating.

Tuesday, December 14, 2010

Your 2010 Handmade Gift Guide

I love presents. Love love love them. I love giving them and I love getting them. I love the anticipation that comes before them and the emotions that come along with the unveiling. So you can bet I love Christmas. And I RELISH the feeling you get when you have found a fabulous, personalized Christmas gift for someone in your life.

There is no better place to find unique, thoughtful gifts than the electronic bible for all things handmade, Etsy. I was reminded the other day that not every human on the planet knows about Etsy (though my gut tells me everyone reading this blog does), when a guy I work with came looking for a recommendation for funky jewelry. I suggested Etsy and (obviously) he was delighted with the results.

To save you folks time, I pulled together some of my Etsy faves that would make great gifts this holiday season.

*Please note that all photos shown below are the property of the sellers listed. Sources are available in the corresponding product links.

Stuff someone's stocking with this beautifully crafted footed mini cutting board made of rock maple ($32) from Gray Works Interpretive Furniture Designs. The Gray Works duo creates everything exclusively from locally, sustainably harvested or salvaged hardwoods in Woodstock, NY. This gift will prove both eco-friendly and countertop-friendly.


Looking for a hostess gift? Live From Bklyn has unique and affordable block print tea towels, like the williamsburg flour sack towel ($15) pictured here, that are sure to delight your entertaining friends.

Finally, a cool twist on the old standby gift for men. The peeps at the Cyberoptix Tie Lab have taken the "theme" tie and made it cool (incredible, right?). My personal fave is the turntable tie ($40), but among other awesome themes, they also have a beer tie and a bacon tie. Picture this: Guy gets compliment on classiness of the tie his significant other purchased (score one, significant other). In greatest moment of guy's life, he can exclaim that his tie in fact depicts bacon! There are no losers here.


Buying for babies? Save the little ones from the mundanity of Babies'R'Us (gah, that place gives me an eye twitch) and pick up a smart creature dance party onesie ($16) from by bethany.


If you've got a chef on your list, consider these beautiful handmade porcelain measuring cups ($32.70) from Mudaliscious. Bakers in particular will delight in having such unique tools for their tasty endeavors.


Caramel of the Month Club ($56 for 6 months) from Have it Sweet. A delicious new caramel every month! Need I say more? Have it Sweet is not accepting any more orders for Christmas, but you can purchase the Caramel of the Month Club for your sweet-toothed loved ones and let them know it's coming.


I like bikes. Everyone likes bikes. They are reminiscent of a simpler time (says this wise old 28 year old). Jazz up your drinkware collection with these screen-printed bicycle glasses ($35 for 4) from Vital. Or if you're a high roller, customize it!

Not buying gifts for everyone? Spread holiday cheer with the cutest cards imaginable from Deepfried Curious & Delicious Paper Goods. I'm partial to the vintage style note cards featuring Rudolph, Santa and Frosty ($26.50 for 18), but she's got note cards and other paper products for all occasions. Don't you just want those card characters to come to life and start talking to one another? Because I do.

Good luck shoppers - only 11 days left! (PS - I realize that shipping from little Etsy shops may take longer than from conglomomart.com and that I should have posted this sooner. But I didn't.)
Related Posts Plugin for WordPress, Blogger...