Showing posts with label salads/sides. Show all posts

Friday, February 18, 2011

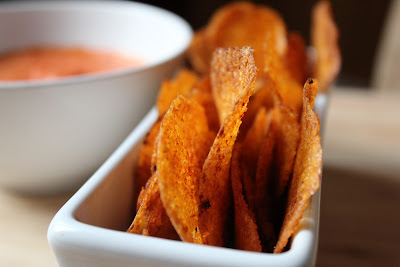
Love Your Heart: Spicy Polenta Chips w/Roasted Red Pepper Dip (low-sodium)


If there's one thing I like, it's a challenge. So when my friend Sarah R.C. suggested that I check out Sodium Girl's website and participate in her Love Your Heart Recipe Rally, I said, sign. me. up. But seriously, making a low sodium dish? That didn't even sound like a challenge, more like just a new theme for a post. Boy did I get a double dose of sodium reality. Cutting out the Na is hard, folks.

"Sodium Girl" Jess was diagnosed with Lupus in 2004 and has since had to severely curtail the sodium in her diet. But she hasn't let that stop her from eating delish foods everyday (or so it appears from her posts). You can read her story here. In honor of National Heart Health Month, Jess organized the Love Your Heart Recipe Rally to bring bloggers together in posting heart-healthy, low-sodium recipes. 

The parameters for the Rally were to pick a typically salty dish that you love, identify the ingredients that are high in sodium and then craft a low-sodium alternative recipe. The goal was to keep each serving under 40mg of sodium. Now, if you, like me, have never monitored your sodium intake, that number means nothing to you. To put it into perspective, the average American takes in more than 3,400mg of sodium per day.*

Oy. And I'm supposed to make something tasty with less than 40mg/serving? More challenging than I thought.

*The USDA has recently recommended limiting that intake to 1,500mg to 2,300mg per day, depending on your age and other health factors. Check out the USDA's new key recommendations for what we should be ingesting each day.
For my Rally recipe, I chose the classic salty snack of chips & dip. Here is your typical sodium intake after one serving of chips & dip:

Potato Chips & Onion Dip
  • 1 oz. Lay's Classic Potato Chips - 170mg (Baked Lay's - 180mg)
  • 2 tbs of Dean's French Onion Dip - 170mg
    •  Total - 340mg
Tortilla Chips & Salsa
  • 1 oz. Tostitos Hint of Lime Tortilla Chips (my fave) - 160mg
  • 2 tbs of Tostitos Medium Chunky Salsa - 250mg
    • Total - 410mg 
Let's get to work.
For my take on the chips, I decided to do a homemade "frito" with yellow corn grits. Corn grits, also known as polenta, are like cornmeal, but more coarsely ground. Any store that sells Bob's Red Mill products should carry the grits. And for the dip, I wanted something creamy - akin to southwestern ranch. Since I love red pepper hummus, a roasted red pepper seemed like the perfect sodium-free route to flavor in my dip. 

If you've never roasted your own peppers before, do it. Now. With this recipe. It's a really cool process and it feels good to go from a fresh veggie to a healthy, tasty dip.
Like I said, I've never paid close attention to how much sodium is in my diet. I could probably tell you down to the calorie the breakdown of fats, protein and carbs, the fiber content and the sugar levels of most things I eat. But sodium? No sé. Initially, I kind of thought I could process a pepper and some lowfat yogurt or sour cream and BOOM, I'd have an awesome dip. Not so much. When I first tasted the pepper puree mixed with sour cream and a dash of chili pepper, I was bummed at how bland it was. :( I looked through my cupboards and everything I wanted to add was chock-full o'sodium. Hot cherry peppers in a jar, sliced jalapenos, canned green chilies, white beans - sodium, sodium, sodium!

And adding even a smidge of salt to the dip was out of the question. One teaspoon of table salt contains 2,300mg of sodium. So even if I sprinkled in a scant 1/16 teaspoon of salt (a few shakes or grinds), I would have been adding over 140mg of sodium to the two-serving dip, which would blow my 40mg/serving limit.

After poking around Jess's site, I decided that vinegar might give the dip the tang I was looking for - and it did! That and some cumin and I was starting to have the semblance of a dip worthy of my chips (which came out awesome by the way - the trick is to spread the corn mixture as thinly as possible before baking).
While I have no intention of going sodium crazy and cutting out all the salt in my life, this exercise opened my eyes to a part of my diet that I was paying zero attention to. Previously, I wouldn't have given any thought to whether I put two grinds of salt or four into my eggs. Only now do I realize how much each grind counts! And I discovered that all of my flavor go-tos were in cans or jars (and thus rife with added sodium). Maybe I'm getting more sodium than I thought and maybe it's time to pay a bit more attention to how I flavor my foods.

On Tuesday, the Washington Post published a timely article with the tagline, "How hard is it to reduce your salt?" According to staff writer Tim Carman, who went low-so for one week, very. I think he wanted to bath in canned soup after every salt-deprived meal. Carman's approach may have been a bit aggressive based on his admitted predilection for salty foods, but his overall result was positive: increased awareness of sodium levels and identification of a few nutritional gaps in his diet. Mr. Carman and I both learned a lot this week.

Thanks to Jess for the healthy inspiration! Links to the other Rally recipes will be available on Sodium Girl today, along with Jess's arsenal of low-sodium tips and meal suggestions.
And with that, I give you my Love Your Heart recipe. Here's to healthy ticking.

Spicy Polenta Chips

Makes around 36 chips; serves 2

-1/2 cup polenta (aka corn grits)
-1/2 tsp. chipotle chili pepper (choose any sodium free ground chili powder; I used McCormick Chipotle Chili Pepper)
-3/4 cups boiling water
-1 tsp. olive oil
-paprika

Preheat oven to 450 degrees. Mix polenta and chili powder in a bowl. Add boiling water and olive oil, stirring well. Wait a few minutes to allow the corn to absorb the water. Spoon 1/2 teaspoon to 1 teaspoon-sized dollops of mix onto a parchment lined cookie sheet. Using the back of a spoon, spread the corn mix into a disk as thinly as possible without having big holes. Sprinkle chips with paprika. Cook the chips at 450 for 10-11 minutes or until they start to brown and lift up at the edges.

Nutrition (per serving): 10mg sodium, 150 calories, 2.5g fat, 1g saturated fat, 27g carbs, 1g fiber, 1.5g protein

Roasted Red Pepper Dip

Makes 1 cup; serves 2

-1 red pepper, roasted, skinned and seeded
-1 tbs. vegetable oil
-1/4 cup low fat sour cream (check sodium content)
-1/2 tsp. chipotle chili pepper
-1/2 tsp. cumin
-2 tsp. good vinegar (I used a white balsamic)
-paprika

Set your oven to a high broil (or around 500 degree). Coat bell pepper in vegetable oil using a basting brush or your fingers. Because of the high cooking temperature, stick with vegetable or canola oil and not olive oil. Place whole pepper on its side in a pan and put in the oven. Rotate the pepper on its side a 1/4 turn every 3 to 5 minutes. You want the skin to get blackened, but not split open. Total roasting time should be 15-20 minutes, rotating as needed for an even char.

Remove pepper from the oven and place in bowl with a cover. Let pepper sit covered, steaming for 10-15 minutes. Once pepper is cool enough to handle, peel off the skin. Then pull off the stem and scrape out the seeds. Squeeze out any excess juice as you do so.

Slice the roasted pepper into 4 or 5 chunks, making sure to remove any blackened skin or seeds. Place roasted pepper chunks in a food processor and process for 30 seconds, scraping down the sides as needed. Let pepper puree sit until completely cooled. If any excess liquid collects, drain the puree.

Add sour cream, chili pepper, cumin and vinegar to the puree. Stir well or process for another 15 seconds. Refrigerate for at least an hour. Garnish with paprika. Enjoy with homemade spicy polenta chips.

Nutrition (per serving): 20mg sodium, 90 calories, 4g fat, 2g saturated fat, 20g carbs, 1g fiber, .5g protein

Monday, December 27, 2010

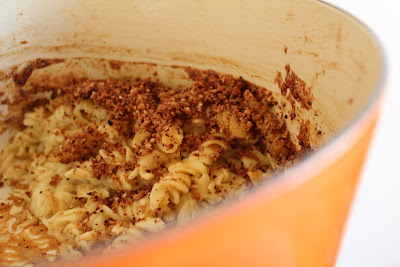
Cupboard Mac & Cheese with Brie, Fontina, Goat and Cheddar


I hate wasting food. A lot. I think sometimes Travis is appalled by my attempts to salvage food in our house when, ahem, perhaps a bit too much time has gone by. But groceries are so expensive in DC, I just can't stand not using them. 

For various reasons (holiday entertaining; my own weakness at fancy cheese counters), we had several partial blocks of really good cheese left in our fridge that I knew weren't going to get eaten. So when it was time to cook something for an afternoon Christmas get-together, I decided that I would try to make mac & cheese using the items I already had in my house, namely the aforementioned cheese.

The bulk of the cheese we had was brie and fontina, neither of which is typically used in baked macaroni and cheese. They are both mild and on the sweet end of the cheese spectrum (at least, the generic, unaged versions), whereas most mac & cheese recipes call for stronger, sharper cheeses (e.g., cheddar, Monterey Jack, Parmigiano-Reggiano). My mom always told me that a really good cheese will make your toes curl, but I think that only applies to sharp cheeses. A delicious brie might make your heart flutter, but it won't curl your toes. So I knew I would need to dress the cheeses up with a little something extra. Like my favorite white wine and some fresh rosemary.


Be aware that even though I dressed it up with rosemary and wine, this is a mild dish that is not super rich. I have a recipe for a very decadent mac & cheese that calls for no less than 1 quart of whole milk or cream and 6 tablespoons of butter - this is not that mac & cheese. But it is a really delicious recipe if you are looking for a lighter flavored, but still comforting macaroni. 

I brought the mac & cheese as a side dish for a hearty chili dinner with some of Travis's friends from grad school, which the host, Jenny, affectionately refers to as the "Michigan Family." (Her kids are in fact the first children to ever call me an "auntie"!) The Michigan Family recently got a new addition, baby Logan (he's the redheaded cutie with Angelina Jolie lips below), so we had lots to celebrate! 

Among other things to celebrate at the close of this year was the end of Jenny's countless surgeries as a result of a double mastectomy and subsequent reconstruction. She is a two-time breast cancer survivor and has the most amazing attitude you can imagine. At one point over dinner, she recounted the Single Girls' Apple Pie, and jokingly said "What does it take to get a blog entry about my tragedy?!" I'm working on something good, girlfriend.


And because the growing brood of kiddos really adds to the flavor of a Michigan Family gathering, I couldn't resist sharing a few photos. This is the face of a kid who is not interested in mac & cheese until he has downed some chocolate.

This is also the face of a kid who is not interested in mac & cheese. Because he has no teeth. Look at that little mouth - it doesn't get any cuter.

This one's a future blogger. She had some thoughts on my content.

And this one schooled me in grammar.

I've called this dish "cupboard" mac & cheese to encourage you to make use of whatever pasta/herbs/cheeses and half bottles of wine you've got around your house. I promise, you can't screw up noodles baked in melty cheese and good wine.

Cupboard Mac & Cheese

Serves 8-10 as a side
  • 12 oz. pasta of your choice (suggested: rotini, fusilli, or gemelli)
  • 1 large or 2 small slices whole wheat sandwich bread
  • 1/3 cup walnuts and/or pecans (if you want to skip the homemade breadcrumbs, swap in 1/2 cup bread crumbs for the sandwich bread, nuts and 1 tbs. butter)
  • 2 tbs. butter, divided (1 tbs./1 tbs.)
  • 1 tbs. olive oil
  • 2 cloves garlic, chopped
  • 1 tbs. chopped rosemary (fresh if you have it - we have a very overgrown rosemary bush in our yard)
  • 1/2 cup of your favorite white wine (I used Sauvignon Blanc)
  • 2 tbs. whole wheat flour 
  • 1 cup milk (I used skim)
  • 4 cups of shredded cheese (I used roughly 1 cup bleu goat cheese, 3/4 cups cheddar, 1-1/2 cups brie, 1-1/4 cups fontina)
  • 1 tsp. kosher salt
  • pepper to taste

Preheat oven to 350 degrees. Tear wheat bread into large chunks and place in a food processor; pulse several times until mostly crumbly. Add nuts and continue to process until ground into crumbs. Melt 1 tbs. of butter in a large skillet. Toss crumbs into skillet and toast for 5-7 minutes, stirring often. Or, use pre-made breadcrumbs as noted above.

Cook pasta according to directions for al dente consistency. Usually 8-10 minutes. Drain and set aside.

Heat up olive oil and 1 tbs. butter in a large pot. (If you have an oven-safe pot, use it, so that you can go directly from stovetop to oven.) Saute chopped garlic and rosemary in the hot butter/oil for 2-3 minutes at medium heat. Reduce heat and slowly add wine (turn on your fan, because it will smoke a little). Let the wine heat up and then add flour. Turn heat back up to medium and stir until the mixture thickens. Add milk and stir for a few more minutes. Add cheese, salt and pepper; stir until melted. Add cooked pasta and stir.

Top with toasted breadcrumb mix. Bake for 30-35 minutes.

Sunday, October 31, 2010

Spicy Thai Slaw and Lechon Asado


Disclaimer: no recipe for roast pig (lechon asado) here, just slaw. Every year, our friends Eric & Christal (and Eric’s dad) host a slammin’ pig roast. I think Eric and his dad have been doing this for 10+ years, but I haven’t been in the picture that long. This is not one of those affairs where a company comes in to roast a pig for you or the hosts purchase a pre-roasted porker. Eric puts the pig on a spit at 7am in his backyard and slow cooks the meat all day until chow time at dusk. It's real, and it's spectacular (for the non-faint of heart).

I decided I wanted to make some kind of cold salad to go with the melt-in-your-mouth pork, but not anything mayo based. Inspiration: spicy Thai papaya salad. (You may have already deduced that papayas did not make the cut for this version.)


I spent around 18 hours in Thailand. During that time, I think I managed to visit at least 9 food/drink establishments (admittedly, I’m counting bars in that tally). In fact, the only things I recall doing in Thailand are eating, drinking and looking for places to eat and drink. Oh, and we saw the reclining Buddha. He was pretty sweet. In our cultural defense, most of Bangkok was shut down due to an election. Not that I need to defend myself, because one of the best things about travel is tasting and learning about the local fare.

I was traveling with my friend Sam and we were on the very last leg of our trip, searching for our final authentic Asian meal before hitting the airport. We were pressed for time and ended up at little joint with a menu that looked like any menu you’d see at a Thai restaurant in the US. Except...the items on this menu tasted 100 kajillion times more delicious than the same items found in an American Thai restaurant (seriously, my mouth is watering right now thinking back on the meal). I had green curry with chicken and a spicy papaya salad. And when they say spicy in Thailand, they mean SPICY. Like, eyes watering, throat on fire kind of spicy - but so good, you can't keep your fork from making return trips to the plate.

The papayas used in this kind of salad are unripe or “green” (crunchy, not sweet), and unfortunately, I couldn’t find unripe papaya in DC on short notice. So I decided to use crunchy purple and green cabbage in its place. I scanned the internet for Thai salad recipes and pulled the ingredients that sounded good.


This little lady, Attie, was our houseguest for the weekend. She answered all my food questions and was surprisingly knowledgeable on southeast Asian cuisine.

ii

As you can see, finalizing this recipe was a labor of love. The result was exactly what I wanted. If I had been making this just for myself, I probably would have made it spicier, but the recipe as written works well for crowds.


Spicy Thai Slaw

Dressing
1/2 tsp. crushed red pepper flakes (or more to taste)
2 tbs. sesame oil (vegetable oil will work)
1/4 cup rice vinegar
1 tbs. sugar
1 tbs. soy sauce
2 tsp. freshly grated ginger
2 tbs. lime juice
1 clove minced or grated garlic
1 tbs. chili paste
1/4 tsp. salt
1/4 cup (handful) cilantro leaves

If you think of it, mix the red pepper flakes into the sesame oil several hours prior to making dressing so that the oil has time to infuse the pepper heat. Mix all ingredients in a food processor or blender until smooth.

If you need/want to substitute or eliminate things above, go for it. One recipe I came across used basil instead of cilantro. If you can't find chili paste, chopped Asian chili peppers would work. I definitely recommend using fresh ground ginger though. If you haven't used fresh ginger, it will change your life. This is what fresh ginger looks like in your grocery store and its very cheap. Slice off the brown skin and grate it on a microplane or the side of a cheese grater with tiny holes.

Salad
1/2 large head of purple cabbage, cut into strips
1/2 large head of green cabbage, cut into strips (or full head of one or the other)
4 scallions, thinly sliced (including the white parts)
1/2 red bell pepper, thinly sliced
1 barely ripe or unripe mango, grated (should feel hard when you squeeze it)
1/4 cup peanuts, crushed (a few pulses in a food processor)

Toss all salad ingredients except for peanuts with dressing. If you have the time, mix up the slaw and give the cabbage an hour or two to pickle in the dressing. Refrigerate until ready to serve. Toss again before serving and sprinkle with crushed peanuts.

Serves 10-12 as a side


Thursday, October 28, 2010

Last Chance Guac


Avocados are always in season. Guacamole, however, is not. Guacamole is for picnics, tropical vacations and summer barbeques in the backyard. There is something about warm weather that makes the avocados at the market scream “mash me up with lime juice and PUT ME ON SOME TORTILLAS!” Once cold weather hits, they just kind of gurgle and murmur like sleeping toddlers (which is fine for say, an avocado fated for creamy soup or sliced over a warm open-faced portabella sandwich). But guacamole calls for some seriously jazzed avocados.

Warm weather lasts for a long time in DC, but recently I got the feeling that I was looking at one of my last screaming avocado weekends before they settle down for the season (after all, technically it
is fall). The avocados - and fresh cilantro and tomato - did not disappoint for their final show. My super-slick avocado slicer swept through each half like a hot knife through butter, which is just how a ripe avocado should feel when cut. 


I’ve made guacamole at least a dozen times, and honestly, it doesn’t always taste good. If you get a bland or bitter batch, it’s probably not because you have a bad recipe, but more likely due to unripe avocados. My recommendation is if you can’t find ripe avocados, skip the guac until they’ve ripened. And while we’re on the topic of guacamole tips, to keep it from browning, place the avocado pits into the bowl until ready to serve.   

Last Chance Guac

2 ripe avocados (should be soft when pressed, but not visibly mushy)
1 roma tomato or 1/2 beefsteak, diced
2 tbs. fresh cilantro, chopped
2 tbs. jalapeño peppers, chopped
juice from 1/2 lime (roughly 2 tbs.)
salt and pepper to taste (I use 8-10 grinds of each)

To remove the avocado flesh, use a large knife to cut lengthwise around the avocado (cut into the avocado until you hit the pit and then rotate the knife around the pit). To separate the halves, hold each side and twist in opposite directions. To remove the pit, whack your knife into it and turn. The pit should come out easily (be very careful when removing pits from the knife because they are slimy buggers; wrapping the pit in a napkin before removing works well). If you don't have a handy dandy avocado slicer like the one pictured above, holding the avocado in your hand, run your knife through the flesh a few times in each directly without cutting the skin (essentially you are dicing the flesh inside the skin). Then scoop out with a large spoon.

Add remaining ingredients and mix with a spoon. If using fresh jalapeños (spicy!), thoroughly chop before adding. If using canned or jarred jalapeños (which lose some of their heat in the preserving process), a rough chop is fine. 

This recipe is for a small batch. Serves 4 as an appetizer with chips. If using as a condiment for fajitas or burgers, it should be enough for 8.

Sunday, October 3, 2010

Curried Chickpea and Roasted Butternut Squash for Champions


Last weekend, I arm wrestled a large, angry roller derby girl who was so aggressive, she was foaming at the mouth (truth: she was large, but actually quite congenial and definitely not foaming at the mouth). It was a hard-fought battle. 
 
Said arm-wrestling took place at the annual H Street Festival in a rapidly-gentrifying section of Northeast DC known as the Atlas District. Over the past few years and up until about a year ago, H Street, NE had developed an enclave of cool, kitschy bars that attracted a modest but healthy crowd (gems: Palace of Wonders, Granville Moore’s). Very recently, however, shops and restaurants have started springing up in every lot between 8th and 14th Streets. As a result, the festival was CROW. DED.  In a good way. In a diverse way. The way that reminds you that you really are part of a giant city with millions of people who live their lives in all sorts of awesomely different ways (because sometimes DC can feel empty, like downtown on weekends, and buttoned-up, like my office everyday). 


Participating in the festivities were the DC Roller Girls. For $1, you had your choice of Roller Girl to arm wrestle (unfortunate: somehow I got hosed into picking the RG that hadn’t been picked to wrestle anyone yet...ummm, for a reason). But I was undeterred. Earlier that day, I had prepared - and snacked on - my absolute fave salad of roasted butternut squash and chickpeas for a post-festival BBQ at my friend Joe’s. Joe very presciently invested in a home near burgeoning H Street about a year ago. Butternut squash is colorful and fibrous and full of anti-oxidants (how could I lose, right?).

Wrong. Despite the power-squash and the many hours I’ve logged pumping iron (truth: zero hours logged pumping iron), I lost. Next time I’ll wear skates.


The best thing about this dish is that as long as you get good butternut squash, it doesn’t matter what spices you add, this dish will taste good. Swap out the curry for fresh cilantro and you have a tasty Latin dish. Use cardamom and cinnamon, and add a little soy milk or cream for a winter warmer. Yum.

                          
Curried Chickpea and Roasted Butternut Squash

2 cans chickpeas
2-3 cups fresh or frozen butternut squash (fresh is best!), cubed
1 medium yellow onion, diced
1 roma or 1/2 beefsteak tomato, diced
2 cloves garlic, minced
1/4 tsp. ginger
1/2 tsp. cayenne pepper
1-1/2 tsp. cumin
2 tsp. curry (I used yellow, but any curry works)
salt and pepper to taste
olive oil, lots
1/4 cup water

Preheat oven to 350 degrees.  Drain and rinse chickpeas; toss with olive oil until lightly coated.  Roast chickpeas for 10-15 minutes (remove when chickpeas start to split open). 

In a deep pan or stockpot, heat 3 tbs. of olive oil over medium heat and add diced onions.  Cook onions until soft.  Add garlic and cook for 3-5 more minutes.  Add squash and cook for another 15 minutes or until squash can be broken down with a spoon.  Add spices and 2 tbs. of oil and mash squash fully with spoon or potato masher (mash to whatever consistency you like; I like mine a little lumpy).  Add chickpeas and 1/4 cup water.  Mash chickpeas roughly. Finally, add tomatoes and stir to incorporate.
 
Feel free to add oil as needed throughout the cooking process. Serve in a pita, over greens or by itself. 

Serves 8-10 as a side dish or 4-6 as a main course. 


Related Posts Plugin for WordPress, Blogger...