Showing posts with label brownies/bars. Show all posts

Friday, April 8, 2011

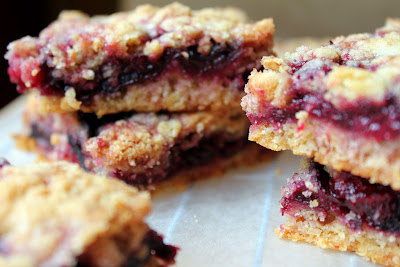
Cherry Bars and Cherry Blossoms

This just in: while cherry blossoms may have been in season for the last two weeks, cherries were not. I had the brilliant (but probably not so novel) idea to do a cherry dessert in the spirit of the Cherry Blossom Festival that has been going on here in DC. I was so excited about this plan that I stopped at Capitol Hill's local gourmet kitchen shop, Hill's Kitchen, straight off the metro after work to buy a cherry pitter. Shortly thereafter I arrived at the grocery store to discover that my only cherry options were frozen ones. Fresh cherries won't be around these parts until June. And thus my food education continues.
Oh well, the cherry show must go on. I decided to bake some cherry bars for my friends Allison and Mike (you may recall Allison as the MacGyver of baking), and their new little munchkin, Lucas (because you know my motto, babies call for bars). I first met Baby Lucas in the hospital before he was even a day old (my first time seeing a baby so new!). Since he was fresh out the oven, he kept his little arms and legs all curled up to his body as though he was still confined to a belly. I've loved him to bits ever since.

Lucky for me, mom emails out a single photo of her little cutie every few days so I can see him grow even when I can't fit in a visit. Nothing fancy, just a pic that she takes with her phone. I think the single photo every few days method is GREAT. Honestly, I might not always have time to peruse a lengthy album right away (though they are still appreciated!). But I always have time to open an email and have a smiling baby face looking back at me.
And now, drumroll please.... Here he is! He was actually awake and smiley for a lot of the visit, but I was too busy playing with him to get any photos. So you'll just have to enjoy him in this equally cute snoozing shot. Mom, dad, baby and I took a stroll around town (we may or may not have stopped for delicious cupcakes at Baked & Wired). Two stranger-ladies were so enamored by Lucas that they conspicuously pointed and started talking about him (is that what happens when you carry around a baby?). Allison graciously gave them a good look at babes and then we shuffled along. She's a good sport. (Sidebar: I've heard that stranger-ladies will go as far as to touch pregnant bellies. NOT OK, ladies. If I ever have a pregnant belly and I don't know you, hands off or you might get smacked.)

And for good measure, here are some photos of the blossoms:


Cherry Bars

Makes 16 bars

2 cups all-purpose flour
1/3 cup white sugar

1/3 cup brown sugar
3/4 tsp. baking powder
1/4 tsp. salt
zest of one lemon

10 tbs. (1 stick + 2 tbs.) cold unsalted butter, cut into chunks 
1 egg
1-1/2 to 2 lbs. frozen cherries (sour if you can find them)

2 tbs. lemon juice
1/4 cup white sugar (for mixing with cherries)
1 tbs. cornstarch


Thaw the cherries completely and lightly press into a strainer to drain, getting out as much excess liquid as possible. Roughly chop the cherries so that they are halved. If lots of liquid is coming out, drain again. Set cherries aside.

While cherries are thawing, cut butter into chunks and place back in the fridge.

Preheat oven to 375 degrees. Stir flour, sugars, baking powder,  salt and lemon zest together. Mix the egg and butter into the dry ingredients using a pastry cutter or your hands until the butter is incorporated and the dough forms pea-sized bits. A pastry cutter is ideal because you want the butter to stay cold. Using your hands warms the butter up, but, honestly, your hands are the only tool that will work besides a pastry cutter. Dough will be crumbly.

Pour half of the dough in a 9" x 9" square baking pan and pat down evenly.

Again, making sure all excess liquid is out of the cherries, stir cherries together with lemon juice, sugar and cornstarch. Pour cherry mix into pan (if there is a lot of liquid, spoon cherries into the pan using a slotted spoon). Spread remaining dough over top of cherries. I like my top crumb to be a little smaller than the bottom crust, so I had a bit of dough left over. 

Bake at 375 degrees for 40-45 minutes or until top is golden-brown. Pack up and bring for a picnic under your favorite blossoms.

Wednesday, March 9, 2011

Sweet Potato Quinoa Granola Bars and Thumbs-Up Running

I'm a thumbs-up runner. And that doesn't mean I'm so excited to be running that I throw thumbs-up signals to everyone else on the streets (though I'm known for an occasional high-five). It means that my hands naturally get into stiff little thumbs-up positions while I run, which, if you test it out right now, you'll discover requires some effort by your muscles. Go ahead - bend your elbows at your sides and look at the natural position of your hands. Then see how many muscles you have to use to form a thumbs-up. Newsflash: while they may put a smile on someone's face, thumbs-up don't make you any faster or more efficient.

I bring this to your attention, not so you that can spot me in a race, but so that next time you're running (or biking or rollerblading or moon bouncing) you stop to think about your body position and any unnecessary energy you might be expending on tense muscles. Take five seconds to consider the muscles that are flexed and whether they are actually helping you with your activity. If not, make an effort to shake em out every once in awhile.

Though I can't stop myself from thumbs-upping completely, now that I'm aware of it, I can release the tension in my hands and wrists when I think of it and give my body a break from spending needless energy keeping my fingers tight and my thumbs up. That way, more of my kcals can go towards getting me from point A to point B.  
After this past weekend's rain-riddled, thumbs-up run (with plenty of conscious hand relaxation!), I came home and I really wanted some calories. In my body. Stat. Enter sweet potato quinoa granola bars. A delightful blend of carbs, fiber and protein. If I had to compare them to a commercial product, I would say they are most like Larabars in consistency. I haven't come across a Larabar that uses oats or grains (or whatever mysterious family quinoa is in), so nutritionally, they aren't the same. But these bars have a fruit-chewy bite to them, rather than the crispy-chewy feel of regular packaged granola bars. I will call mine Katibars.

Sweet potato quinoa bars would be great to bring on a long bike ride or hike. Between the fruit, sweet potato puree and agave syrup, the sugar content is high; and the nuts and quinoa provide some protein. The fiber content is also high from the oats and quinoa, so be conscious of what your body is used to while working out.


Side note: when I was studying for the bar exam, I signed up for pottery class as a stress-relieving, extra-curricular activity. In my head I imagined throwing serving bowls and two-foot vases; Christmas gifts galore! In reality, I ended up with boatloads of condiment bowls and a rough, rough, cream pitcher. So I'm giving them some mileage on this blog. Hence the photo of just a bowl. Thx for indulging.

Sweet Potato Quinoa Granola Bars

Makes 12 bars

2.5 cups old fashioned oats
1/4 tsp. nutmeg
1/8 tsp. ginger
1/8 tsp. cloves
1 tsp. cinnamon
1/2 tsp. salt
1 tsp. vanilla
1 cup sweet potato puree
1/2 cup agave syrup
1/2 cup uncooked quinoa
1 cup roughly chopped nuts (I used half pecans, half almonds)  
1/2 cup dried cranberries

Preheat oven to 325 degrees. Toast the uncooked quinoa on the stove in a wide pan over low heat, 8-10 minutes, stirring often (quinoa grains will pop in the pan). Mix oats, spices, and salt together in a large bowl. In a separate bowl, stir together sweet potato puree, vanilla and agave. Add wet mix to oat mix, making sure that all oats are moistened. Stir in quinoa, nuts and cranberries.

Line an 8" or 9" square pan with one piece of parchment paper so that the edges of the parchment paper hang over two opposite edges of the pan (so that you can lift the bars out of the pan after baking). Press granola mix into the lined pan.

Tip: to press the granola evenly into the pan, spread mixture around and cover top with wax paper. Then use a smaller pan or heavy square/rectangular item to press down on the wax paper. Repeat this process over all of the granola until even.

Bake at 325 for 22-25 minutes. Let granola cool in pan; remove for easy cutting. Then enjoy your own [name]bars.

Sunday, November 7, 2010

Halloween Triple Fudge Brownies with Peanut Butter Cream Cheese Icing

It's Halloween!!!!!!!!! No, wait, it's not Halloween. It's November 7, which is nothing (unless you count the first day after daylight savings time as an event worthy of mention; your call). But I've discovered that this whole blogging about real events thing doesn't always translate into "current" posts. Cuz dang, folks, cooking/photographing/editing/writing/posting is a time consuming process. Generally, I can get around this problem by fudging when events occur, but for some things (e.g., major holidays), that just doesn't work. 

Since becoming a food blogger a month ago, I've tried to check out as many other food blogs as I can. And let me tell you, there are LOTS, just oodles of food blogs out there. People will post about anything from baking dog biscuits to filling nearly empty peanut butter jars with yogurt (I read not one, but two blogs in the same day highlighting this pb jar phenomenon). Some bloggers tell you all about their lives and experiences and make you feel like you're BFFs even though you've never met (Front Burner Blog - thanks for the intro, Carrie!), and some have photographs and styling that are so breathtaking, you could just die (What Katie Ate - seriously, so good it kills me; see the cheese shop photo shoot).

I've discovered that some people can just blog and blog and blog and blog and do it everyday. They must have superpowers (or no day jobs). These super-bloggers are reading my post now saying, "Ha! What a weakling! This girl only posts once or twice a week!" But it's the best I can eek out for the time being and I'm ok with that.

So, now, one full week after Halloween (and 8 days after the party where these brownies made their debut), I'm sharing them with you.


I happen to think brownies from a box are awesome (in particular, the Ghirardelli Turtle Brownies, made in an 8 x 8 square pan so that they come out thick and gooey). I could never understand why anyone would want to make brownies from scratch, when such perfectly delectable chewy brownies could be whipped up with just an egg and some oil. But since I blog about food now, I figured I should Martha up and do some homemade brownie bites. I started at Whole Foods and bought four kinds of chocolate. I didn't use all four, but I like to be prepared. The "triple" fudge ultimately came from: 1) semi-sweet chocolate chips, 2)  bittersweet baking chocolate, and 3) unsweetened cocoa.

But the real deliciousness comes from the PB cream cheese frosting. Holy hannah, it's good.


And a sneak preview of our Halloween costume prop . . . 


Buuuut, I won't make you wait too long for the main event. :) Our costumes were inspired by my amazing arm wrestling feat from earlier this Fall. We were the DC Roller Girls:

I played the part of the "jammer" complete with helmet stars, and we crafted these snazzy t-shirts with sweet roller derby-esque names.

In total we had a six man team, but could never get our act together for a full team photo (roller derby girls are known for being all over the place and generally a little crazy . . . we were just playing our roles).


And there was even some arm wrestling:


Halloween was way fun and resulted in dancing until 4am. Sadly at that point all the brownies had been eaten.

Triple Fudge Brownies with PB Cream Cheese Icing

Brownies
1/2 cup unsweetened cocoa
1/2 tsp. baking soda
1/4 tsp. salt
2/3 cup vegetable oil (divided in half)
1/2 cup boiling water
3 oz. melted bittersweet chocolate
1-1/2 cups sugar
2 eggs
1 tsp. vanilla
1-1/3 cups unbleached flour
1 cup milk or semi-sweet chocolate chips

Preheat oven to 350 degrees. Mix cocoa, salt and baking soda. Add 1/3 cup vegetable oil and boiling water and mix well. Over a double boiler (or a bowl set on top of a saucepan filled an inch high with simmering water), melt the bittersweet chocolate. Stir melted chocolate into cocoa/oil/water. Add sugar, eggs, vanilla and remaining 1/3 cup of oil and mix well. Mix in flour until just incorporated. Fold in chocolate chips.

Grease two muffin tins. Pour batter evenly into tins (cups should be about half full). Bake for 20-25 minutes at 350 degrees. When testing the "doneness" of brownies, I will often take them out even when they seem a little raw in the middle (something I wouldn't do, for example, with cake mix). This helps avoid burned edges. Also, the general public seems to delight in underdone brownies.

PB Cream Cheese Icing (ratios adapted from Food.com)
6 oz. cream cheese (easiest if room temperature)
2 tbs. butter (easiest if room temperature)
1/2 tsp. vanilla
2.5 cups powdered sugar
1/4 cup creamy, all-natural peanut butter

Blend all ingredients using an electric hand mixer until smooth and fluffy. This will work best if your cream cheese and butter are both at room temperature. If you lack the foresight for that (like me), you can microwave each for 5 seconds, then flip and microwave for another 5 seconds. You can obviously use any peanut butter you want, but all-natural PB has a very different texture that makes this frosting AAH-mazing. Smucker's make an all-natural PB, so you should be able to get it at any grocery store.

My brownies came out like craters (the tops weren't flat, more like tiny bowls). To remedy, I did a first layer of frosting to fill in the bowls and catch any crumbs, and then popped the frosted brownies in the freezer (10 or so minutes is fine). Then I did a quick second layer of room temperature frosting, which works better for the spiderwebs.

Ganache (for making spider webs)
2 tbs. heavy cream
1 oz. chocolate (I used bittersweet)

Microwave cream in a mug for 1:45-2:00 minutes (should be simmering when you remove). Add chocolate and stir until smooth. Transfer ganache into the corner of a small plastic ziplock baggie (for use as a piping bag) and snip off the very tip of the corner. Use piping bag to make three concentric circles on each brownie. Using a sharp knife, run the tip of the knife from the center of the brownie outwards through the ganache circles 8 or 9 times (see photos above). Do the knife step shortly after piping the ganache, as it will start to harden up and won't look as webby if you wait too long.

Garnish with Halloween spider rings (or, um, bats if that's all you have . . . ).

Makes 22-24 spooky brownies

Thursday, October 14, 2010

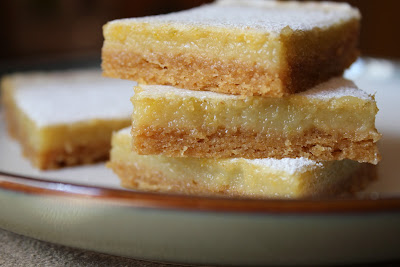
Babies Call for Lemon Lime Bars, Obviously


These bars are the best dessert I’ve ever made. True story. The mix of lemon and lime was inspired by one of the first food blogs I ever visited, Technicolor Kitchen (the author lives in Brazil and is always doing amazing things with fruit), and adapted to fit my love of whole wheat pastry flour (WWPF) and shortage of citrus juice.  WWPF lends itself more easily to baking than regular whole wheat flour, and, in my humble opinion, its flavor is so much better than white flour. WWPF just has more personality. It’s like the Stephen Colbert of flours. I have yet to substitute whole wheat pastry flour for white flour and get a bad result.  

This batch was for the mom and dad of Mikayla, the newest baby on the Hill (confirmed: she’s gorgeous). Mom and dad seem pretty chill about the whole parenting thing, aaaaaand I love it. Kind of like I love these bars. Illustration: dad Chad always said he’d be back out for Saturday morning bike rides right after baby M was born; the peanut gallery thought he was nuts. I’m pretty sure Chad was back in the saddle before his little girl turned a week old. Mom Kirsten probably won’t be long to follow (but we cut her a little slack considering she DID birth a child).

Lemon lime bars are super easy. And should you have only lemons or only limes that you want to use up, go for it (the base for this recipe is actually straight lemon bars). My number one tip is that if you don’t have a handheld citrus juicer (like the one pictured above), buy one. Now. You will never regret it. I balked at the fact that it cost $12, but I’m telling you, it paid for itself in spades. It juices and strains all in one and it gets every last little drop of juice out of your citrus fruit. Look, you can get yours here for even less! The one limitation is size - sadly, it's too small for navel oranges. But it will handle all your lemon, lime, tangerine and clementine juicing needs like a dream (because everyone has tangerine juicing needs, duh).


So let's all send Mikayla some Xs and Os and enjoy some lemon lime bars.  
 

Lemon Lime Bars with Whole Wheat Crust
adapted from lemon bar recipe in Baking Illustrated (by the Editors of Cook's Illustrated magazine)

Crust
1 stick unsalted butter, melted
1/3 cup sugar
1 tsp. vanilla extract
1/2 tsp. salt
1-1/4 cup whole wheat pastry flour

Preheat oven to 350 degrees. Combine melted butter, sugar, vanilla and salt. Add flour and mix until incorporated. Line a 9x11 pan with aluminum foil (for thicker bars, use 8x8 pan and expect longer cooking times). I used cooking spray on the foil, though it probably wasn't necessary - baker's choice. The pan does not need to be fully lined, but the foil should hang over the two long ends of the pan so that the bars can be removed from pan prior to cutting. Press crust into lined pan and bake for 20-25 minutes or until light brown.

Filling
1 cup sugar
3 tbs. whole wheat pastry flour
3 eggs + 1 yolk
zest and juice of 1 lemon
zest and juice of 1 lime
pinch salt
powdered sugar for dusting

Mix sugar and flour. Whisk eggs and stir into sugar and flour. Stir in zest, juice and pinch of salt. The original recipe I used called for 2/3 cup total fruit juice. My fruits produced less juice than this and it was fine. If the fruits seem firm at the store, maybe grab an extra one or two lemons/limes to supplement the juice (or if you like a more tart bar). Pour topping onto hot crust and put in the oven for another 15-20 minutes. Filling should be mostly non-jiggly. 

Let bars rest in the pan for 20-30 minutes after baking, then lift out using the foil edges. Let cool fully on a baking rack before cutting (bars will firm up a lot). Dust with powdered sugar. Dusting after cutting creates a bit more of a mess, but it allows you to cover any nicks from cutting.

Makes 15 bars
Related Posts Plugin for WordPress, Blogger...