Showing posts with label dessert. Show all posts

Wednesday, April 13, 2011

Salted Choco Choco Chip Cookies and a New Addition to the Fam

 
These days, if your cookie doesn't have salt on it, you're a total square. When I was a kid, nobody wanted a salty cookie. That would be like asking for pie with motor oil on top. But now, salting desserts is all the rage: cookies, mini-cakes, ice cream, chocolate bars. Sugar has decided that salt is the Romeo to her Juliet, and she can no longer function alone. 

Despite being a serious dessert lover, and being well-aware of the popularity of salted sweet treats in recent years, I've never had a salted cookie. And I certainly hadn't made my own before now. Every time I thought about it, it seemed like an unnecessarily risky move for a batch of cookies that I knew would be delish on their own. Not this time, boys and girls - full salt ahead.
I decided that a salty topcoat would be most delicious on a dark chocolate cookie (I decided correctly). This batch was a chocolate cookie base with white chocolate chunks. I used vegan buttery spread because that's what I had on hand that day, but butter can be swapped in no problem. Or, in the alternative, you could replace the egg and white chocolate chips to make vegan cookies. For the sprinkling of salt, I found that two pinches of sea salt per cookie was just the right amount. Your gut will tell you to stop after one pinch, but ignore it. Go for two pinches. And make sure you're using large grain sea salt. Tiny grains of table salt won't have the same flavor effect.

The result? Real good cookies. The problem? Salty cookies, much like pretzels or chips or any other salty snack make you want to keep eating them. Mmmmm, that salty cookie was so yummy and salty, I'm thirsty for another. Ooooooh, those two cookies make me want a third even more! And let's not talk about the compulsion I felt for a fourth. Needless to say, they're dangerous. Just make sure you're in a portion-control state of mind when you bake these suckers. Or bring them to a big party where they're sure to go quickly.

And another thing, unlike any other cookie I've ever encountered, these guys are best after they are completely cooled. When you eat them warm out of the oven, the salt doesn't mesh as well with the cookie flavor - it's as if you were eating a regular cookie with some salt sprinkled on ex post bake-o. But once they have a chance to cool, the salt magically becomes one with the cookie and you have a perfect, sweet cookie with the faintest savory bite.

And in other news...

We got a new dog! I usually like to tie the concepts of a post together, but I'm not even going to attempt that here. Dogs don't go with chocolate cookies. Period.
This is our new baby! How cute is that face?!! Her shelter name was Mocha, which we both wanted to change, but nothing else stuck, so Mocha it is. She is 9 months old and we got her from the Washington Humane Society on Georgia Ave. The staff was great, especially the adoption manager. 

If you're looking to add a four-legged member to your family, I urge you to check out your local shelters and rescues before going to a breeder. So many wonderful doggies and kitties already exist and are just waiting for someone to love. If you live in the DC metro area, check out any of the following organizations that help to place pets with the right owners: 
There are a surprising number of breed-specific rescues if you're looking for a certain kind of dog and almost every county has an SPCA or Humane Society - just google what you're looking for. I don't know about all of the shelters, but I know that Lucky Dog has adoption events where they bring their dogs to a neighborhood in DC, MD and VA on weekends so that people can see who's available for adoption. Check the websites to see when they're making a visit to your area. And if you're not looking to adopt a pet but wouldn't mind some temporary furry company, shelters are always looking for foster homes.

In the meantime, you can enjoy looking at our new pride and joy. Aaaaah, I love her!!

Salted Choco Choco Chip Cookies
adapted from FoodNetwork.com

Makes 20-22 cookies

1-1/4 cups flour
1/2 teaspoon salt
1/2 teaspoon baking soda 
1/4 cup unsweetened cocoa 
1 stick Earth Balance Vegan Buttery Spread (or butter) 
1/2 cup granulated sugar
1/2 cup light brown sugar 
1 egg, beaten

1 tsp. vanilla 
3/4 cups white chocolate chips

sea salt for sprinkling

Preheat oven to 375 degrees.

Sift flour, salt, baking soda and cocoa together. Cream Earth Balance with sugars, egg and vanilla. Slowly add dry ingredients to wet, mixing with an electric mixer. Fold in white chocolate chips.

Using a tablespoon or cookie scoop, drop cookies onto a cookie sheet and lightly press each one down using your fingers. Sprinkle each cookie with two pinches of sea salt.

Bake for 10 minutes at 375 degrees. Let cool. Do not feed to pets, no matter how cute they are.

Friday, April 8, 2011

Cherry Bars and Cherry Blossoms

This just in: while cherry blossoms may have been in season for the last two weeks, cherries were not. I had the brilliant (but probably not so novel) idea to do a cherry dessert in the spirit of the Cherry Blossom Festival that has been going on here in DC. I was so excited about this plan that I stopped at Capitol Hill's local gourmet kitchen shop, Hill's Kitchen, straight off the metro after work to buy a cherry pitter. Shortly thereafter I arrived at the grocery store to discover that my only cherry options were frozen ones. Fresh cherries won't be around these parts until June. And thus my food education continues.
Oh well, the cherry show must go on. I decided to bake some cherry bars for my friends Allison and Mike (you may recall Allison as the MacGyver of baking), and their new little munchkin, Lucas (because you know my motto, babies call for bars). I first met Baby Lucas in the hospital before he was even a day old (my first time seeing a baby so new!). Since he was fresh out the oven, he kept his little arms and legs all curled up to his body as though he was still confined to a belly. I've loved him to bits ever since.

Lucky for me, mom emails out a single photo of her little cutie every few days so I can see him grow even when I can't fit in a visit. Nothing fancy, just a pic that she takes with her phone. I think the single photo every few days method is GREAT. Honestly, I might not always have time to peruse a lengthy album right away (though they are still appreciated!). But I always have time to open an email and have a smiling baby face looking back at me.
And now, drumroll please.... Here he is! He was actually awake and smiley for a lot of the visit, but I was too busy playing with him to get any photos. So you'll just have to enjoy him in this equally cute snoozing shot. Mom, dad, baby and I took a stroll around town (we may or may not have stopped for delicious cupcakes at Baked & Wired). Two stranger-ladies were so enamored by Lucas that they conspicuously pointed and started talking about him (is that what happens when you carry around a baby?). Allison graciously gave them a good look at babes and then we shuffled along. She's a good sport. (Sidebar: I've heard that stranger-ladies will go as far as to touch pregnant bellies. NOT OK, ladies. If I ever have a pregnant belly and I don't know you, hands off or you might get smacked.)

And for good measure, here are some photos of the blossoms:


Cherry Bars

Makes 16 bars

2 cups all-purpose flour
1/3 cup white sugar

1/3 cup brown sugar
3/4 tsp. baking powder
1/4 tsp. salt
zest of one lemon

10 tbs. (1 stick + 2 tbs.) cold unsalted butter, cut into chunks 
1 egg
1-1/2 to 2 lbs. frozen cherries (sour if you can find them)

2 tbs. lemon juice
1/4 cup white sugar (for mixing with cherries)
1 tbs. cornstarch


Thaw the cherries completely and lightly press into a strainer to drain, getting out as much excess liquid as possible. Roughly chop the cherries so that they are halved. If lots of liquid is coming out, drain again. Set cherries aside.

While cherries are thawing, cut butter into chunks and place back in the fridge.

Preheat oven to 375 degrees. Stir flour, sugars, baking powder,  salt and lemon zest together. Mix the egg and butter into the dry ingredients using a pastry cutter or your hands until the butter is incorporated and the dough forms pea-sized bits. A pastry cutter is ideal because you want the butter to stay cold. Using your hands warms the butter up, but, honestly, your hands are the only tool that will work besides a pastry cutter. Dough will be crumbly.

Pour half of the dough in a 9" x 9" square baking pan and pat down evenly.

Again, making sure all excess liquid is out of the cherries, stir cherries together with lemon juice, sugar and cornstarch. Pour cherry mix into pan (if there is a lot of liquid, spoon cherries into the pan using a slotted spoon). Spread remaining dough over top of cherries. I like my top crumb to be a little smaller than the bottom crust, so I had a bit of dough left over. 

Bake at 375 degrees for 40-45 minutes or until top is golden-brown. Pack up and bring for a picnic under your favorite blossoms.

Monday, February 7, 2011

Sponge Candy: Heaven by Way of Buffalo


Just a steel town girl on a Saturday night/Lookin' for the sponge of her lii-i-ife. This girl's steel town is Buffalo, NY. (True, Buffalo is not really known as a "steel town" these days, but in the 1900s it was one of the largest steel-producing locations in the U.S. By the mid-20th century most of the steel plants had shut down.) 

Though I don't hail from B-lo, I did spend four glorious years there for college and routinely visited growing up because we had family there. I still go back at least once or twice a year for weddings, babies and food. And let me tell you, BUFFALO IS AWESOME. If you don't think it's awesome, go jump in a lake and/or never speak to me again.

Buffalo has produced some of the greatest things on Earth: buffalo wings (Superbowl Sunday would have no redeeming qualities without these guys); Loganberry juice (ummm, hello, it's purple. That means it's got to be at least 8% natural.); snow (oh, you didn't know they invented snow in Buffalo? Well, now you do. Please inform your old history teachers.); and most importantly, sponge candy.

Sponge candy is basically a puffy kind of toffee, typically covered in milk or dark chocolate. The ingredients are sugar in granule form and sugar in liquid form. And it has similar addictive properties to crack. Just FYI.

In Buffalo, you can't even go into a gas station without sponge candy smacking you in the face, which is just the way I like it. I've been told that they sell similar types of candy outside of Western NY (under the aliases "sea foam candy" or "honeycomb"), but sadly, I have yet to come across any. So when I had a hankering for some sponge candy last week, it seemed my only option was to make it myself.

This past Saturday was another superfun DC blogger event - this time it was a wine tasting at Lauren's place. What better to go with wine than the most delicious chocolate covered candies under the sun?! Perfect op for my spongy experiment.
Some tips:

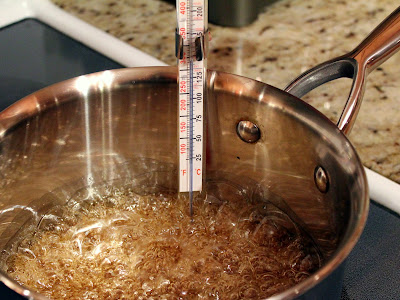
1) If you want to make candy, you need to have a candy thermometer. Don't fool yourself into thinking that you can guess when your candy is at the "soft ball" or "hard crack" stage, because you can't (believe me, I tried). The boiling sugar looks exactly the same at 200 degrees as it does at 300 degrees. I use the Good Cook thermometer that I got for $7 at my local Safeway. It's not exactly high-end, but it does come encased in a glass tube so you don't have to worry about numbers melting into your candy (which is a common complaint about candy thermometers).

If you are looking at thermometers and can't tell which ones can be used for candy making, just look for two things: 1) temperature levels exceeding 350 degrees Fahrenheit (usually they will go to 400 or 500); meat thermometers usually only go to about 220; 2) some kind of clip or hook that allows you to secure the thermometer to the rim of a pot or pan. So you might find a thermometer that is unlabeled or labeled as a frying thermometer, but will work fine as long as it meets the two aforementioned prereqs.

2) Use a single round pan, at least 9" wide. It is tempting to think, "Oh I'll just use my square baking pan. It will be easier to cut that way." Or maybe, "I'll use two smaller pans." No. Wrong. Stop. I already made these mistakes for your benefit. A circle pan works better because you need a stiff mold of parchment paper. Getting a stiff mold in a square or rectangle pan is way harder, trust me. The hot, foamy candy is poured into a lined pan and left to harden. The usable parts of the candy are in the inside, so you want as little surface area as possible (i.e., one mold, not two).

For the same reason, don't halve this recipe (or, if you halve it, use a circle pan with a small diameter so that you have less surface area). If you only want a little candy, I recommend making the whole batch and chucking whatever you don't want. The ingredients are sugar and sugar. Cheap and plentiful.
3) Use at least a medium-sized pot for boiling (at least 3 quarts), preferably one that you can lift with one hand. The candy foams up a lot, so you need a good amount of extra space in your pot. Ideally, you would pour the foam into the line pan with one hand and scrape out any excess with the other hand using a spatula. If you need both hands to lift your pot and then you scoop out any excess foam, that's fine. It just might result in a few lost bubbles.

Also, you will see the leftover foam bits start to harden on your pot and whisk. Don't worry, they will clean up no problem with some hot water.

Ok, I know that was a lot of instruction - on to the candy making!

Sponge Candy
recipe from Intimate Weddings

Makes about a pound of candy

2 1/2 cups granulated sugar
2/3 cup light corn syrup
6 tbs. water
2 tsp. vanilla
2 tbs. baking soda (sift or stir to break up any lumps)
cooking spray
1 bag of milk or dark chocolate chips (or coating chocolate if you can find it)

Prepare a 9-10" springform or cake pan with parchment paper: cut out a circle for the bottom; make a double thick cylinder lining for the sides that reaches several inches above the rim of the pan. Spray the parchment paper with cooking spray. 

Mix sugar, corn syrup, water and vanilla. Pour into pot being careful not to get excess sugar up on the sides of the pot. Place your candy thermometer on the edge of the pot and turn the heat up to medium-high. Without stirring, let the sugar mix come to a boil and then continue to heat up to 300-302 degrees Fahrenheit.

Remove from heat. Take thermometer off the pot (otherwise it will get in the way of your stirring). Immediately add the baking soda and whisk until incorporated (5-10 seconds). Watch the awesome chemical reaction take place before your eyes.

Pour foamy mixture into your prepared pan and let cool completely. Once the foam is completely hardened and cooled, remove from pan and peel away parchment paper. Cut into the hardened foam and begin to cut pieces of candy. Discard the outer 1/4 inch or so of the foam shell - you will be able to see (and taste) the difference between the inner foam and hard shell.

Using a double boiler, melt 2/3 to 1 bag of chocolate chips, depending on how much candy you want to make and how much chocolate you want on each piece. Dip foam pieces in chocolate and set on wire rack or wax paper to cool. Then say goodbye to your life as you formerly knew it and hello to your new addiction.

Wednesday, January 26, 2011

Sour Cherry Buckwheat Scone Cookies

When I moved from Arlington to Capitol Hill (near Eastern Market), it was an adjustment. While I now recognize the awesomeness that is the Hill, I had a hard time separating myself from the land of brown flip flops and infinite Starbucks (thanks for memorializing, Remy). But just days after moving into a rowhouse on 11th Street, SE, an acquaintance of Travis's who lived a couple blocks away stopped by our house bearing homemade banana muffins to welcome us to the hood (the muffin gal is now our dear friend, Judith). With that simple gesture, love for my new digs were sealed. I never got so much as a twinkie from any neighbors when I moved into my Ballston highrise.

We have since left idyllic 11th Street to become homeowners in a more "developing" section of East Capitol Hill. I use that term loosely, because our house is just a few blocks from a pretty well-to-do park...but to give you an idea, my car was stolen from right in front of our house and the corner store has 1-inch thick bullet-proof glass surrounding the register. Anyhow, despite the developing nature of the area, I know that we have some nice neighbors. I've seen them walking their dogs (and obviously dog ownership correlates positively with niceness). Embarassingly though, we know so few of them.

So when some new folks moved into the house at the end of our block, I took a cue from Judith and decided that it was our job to introduce ourselves with a welcome offering. And nothing says let's bond over the local police beat like buckwheat cookies.
The recipe for these neighbor cookies came from the Figgy Buckwheat Scone recipe in Kim Boyce's Good to the Grain (also the inspiration for this Sweet Potato Bread, for which I've received great feedback from people who tested it in their own kitchens). I can't say the figgy scone recipe as printed was a success (the recipe starts with a somewhat complicated "fig butter" that I must have jacked up, because it tasted like I pulled it out of a sewer), but after I ditched the fig butter and tweaked the sizing, the resulting product was a super flavorful, grain-filled cookie.
If you've never used buckwheat flour, count your lucky stars for finding this post. The flavor is strong and nutty and it makes for a super satisfying cookie.  I made pretty small cookies, between 1.5" and 2" in diameter, but if you want a thicker cookie, just leave the dough a little thicker when rolling and make a shorter rectangle.

Sour Cherry Buckwheat Scone Cookies
adapted from Good to the Grain

Makes approx. 50 2" cookies

1 cup buckwheat flour
1-1/4 cups unbleached flour
1/2 cup sugar
2 tsp. baking powder
1/2 tsp. salt
1/2 cup (1 stick) butter, cold, cut into chunks
1-1/4 cups heavy cream
1 cup sour cherry preserves (or your favorite fruit preserves)

Sift or mix dry ingredients together in a large bowl. Add cold butter chunks and work into dry mixture with your fingers until the butter is broken into rice-sized pieces. Add cream and mix with a spatula until dough is incorporated. Dough is sticky and you may need to switch over to using your hands to get all the flour incorporated.

Divide dough into two even pieces. One at a time, roll each section of dough out onto a well-floured surface (keep adding flour as needed to keep dough from sticking) until you have a rectangle roughly 8" by 14" (dough will be around 1/4" thick). Spread half the preserves over the surface of the dough, then roll lengthwise into a log (so that you have a 14" log). Repeat the process with the second piece of dough.

Wrap the two logs in plastic wrap and freeze for 1 to 2 hours.
Remove logs from freezer and heat oven to 350 degrees. Slice dough into 1/4" slices and place evenly on a baking sheet lined with parchment paper or a silpat.

Bake for 18 to 20 minutes at 350 degrees. Deliver to neighbors with a smile. Smile is key.

Thursday, January 20, 2011

French Vanilla Cake w/Caramel Frosting & Brandied Pecans

Holy deliciousness. The french vanilla layers, caramel frosting and brandied pecans in this cake came together like a holy trinity of sweetness. The frosting tastes shockingly similar to the extra icing they sell at Cinnabon (yes, I've indulged in the extra icing, don't judge), and the brandied pecans are sweet and crunchy without having an overly strong, sugary coating like some pralines. The nuts would also be great served as a stand-alone snack or in any other dish that calls for sweet nuts. And as for reviews, I served this mini-cake to seven other people (plus yours truly) and got eight gold stars.

Last weekend, when my main squeeze announced he was doing a poker night with the menfolk, I decided to host a little ladies get-together at my place. So while the dudes were playin' Texas Hold-Em and slugging whiskey, we drank wine, enjoyed this tasty cake and engaged in some chicky shenanigans.

We played a charades game called "Celebrity" (also referred to as "Lunchbox" in some parts; thanks to the team effort from Phil and Laurel for suggesting!). I highly recommend it if you're looking for a game for a bigger group. It's easy to explain, works well whether the guests know each other or not and is very entertaining. (Oddly, of the hundred or so celebrities that we wrote down, there were only two duplicates - Jeff Bridges and Fabio. I'm not sure what that says about us.)
In the past, I've generally made layer cakes with 9" cake pans, and unless we're having a big party, the cake never gets finished. It's just too big for a few people to polish off and the last thing I need is extra cake sitting around our house (considering the fact that I already indulge in most of the baking rejects that don't end up being shared...). So after my friend Erica introduced me to the 6" springform (via an amazing turtle cheesecake), I became a mini-cake convert.

The recipe below is measured for a 6" cake, but if you want a bigger cake (8" or 9"), just double the recipe. Similarly, for any recipes that call for bigger cake pans, divide the recipe in half if you want a 6" cake. If you make a lot of cakes, 6" pans are a great investment. I got eight perfectly-sized slices out of this cake.

French Vanilla Cake (from misshomemade.com)
1/2 cup (1 stick) unsalted butter, softened
1 cup sugar
2 eggs, room temperature
1-1/3 cups plus 1 tbs. flour
1-1/8 tsp. baking powder
1/2 tsp salt
1/2 cup milk
1 tbs. vanilla extract

Preheat oven to 350 degrees. Sift dry ingredients together. Cream butter and sugar with an electric mixer; add eggs, vanilla and milk. Slowly add dry ingredients and continue to blend with electric mixer. Divide batter evenly into two 6" cake pans. Bake at 350 for 30-35 minutes.

OR if you want a bigger cake, double this recipe and use two 9" cake pans. Bake for 35-40 minutes.

Brandied Pecans
1/2 cup pecan halves, roughly chopped
1 tbs. brandy (bourbon, sherry, Grand Marnier would probably all work)
1 tbs. sugar

Stir brandy and sugar together in a medium bowl. Stir chopped pecan pieces into sugar mix until nuts are coated. Spread nuts onto a pan lined with parchment paper or silpat. Bake at 350 degrees for 8-9 minutes, stirring once. Be careful, these will burn FAST. Better to take them out early than late.

Let cool and break up any nuts that are stuck together.

Caramel Cream Cheese Frosting (adapted from Whisk-Kid)
1/4 cup light brown sugar 
10 tbs. unsalted butter, softened and divided (4 tbs. and 6 tbs.)
1/3 cup heavy cream 
4 oz cream cheese, softened
1/2 tsp vanilla
1/4 tsp salt
2-3 cups powdered sugar*

*My apologies, the amount of powdered sugar originally listed here was short.

Melt brown sugar and 4 tbs. butter in a saucepan over medium heat. Stir until sugar dissolves. Bring to a boil over medium heat; remove from heat. Whisk in cream until completely blended. Transfer to a heat-resistant bowl and cool to room temperature, stirring occasionally. When cooled, pour a quarter of the sauce into a ziplock bag to save for drizzling.

Cream remaining 6 tbs. butter and cream cheese in a large bowl with an electric mixer until smooth. Beat in vanilla and salt. With mixer running, slowly pour in cooled brown sugar mixture and beat until smooth. Add powdered sugar gradually, beating well after each addition until completely smooth. Chill slightly for a firmer texture, stirring occasionally.

Assembly:

To assemble cake, place one cooled cake on the plate or cake stand on which you plan to serve the cake, flat side (bottom side) down. Generously apply a layer of frosting and a layer of nuts (about 1/3 of the nuts) to the top of the first layer.

If you want to get a flat cake top, like the one pictured, using a large, serrated knife, slice the rounded top off the second layer of cake (this should be just the top few millimeters of the cake). Place the cake, cut side down on top of the first layer of cake and frosting. If you don't care about having a flat-top, skip the slicing and place the second layer on top of the first layer, rounded side up.

Frost the entire cake with a thin coat of frosting to catch any loose crumbs and fill in divots or gaps. Place cake in the fridge for 20-30 minutes so that the first coat frosting hardens. Then frost the entire cake with a generous second layer and top with remaining nuts.

Snip the tip off the reserved caramel sauce in the ziplock bag and drizzle over top of cake. Serve to friends with a nice white and side of charades.
Related Posts Plugin for WordPress, Blogger...