Sunday, March 18, 2012

Luck O'the Irish Soda Bread

I just started a new job. I used to work in the private sector and now I work for the federal government. Mostly, the switch has been awesome. Better hours, more responsibility, and overall, work more suited to my interests. But I'll tell you, I might have been a little spoiled by certain things from the old job . . . Previously, I had 24-hour access to a free coffee/tea machine with loads of flavors (including cappuccino!). Not anymore (good news, taxpayers, you don't pay for my daily tea). Plus, the kitchen had an endless supply of paper goods and plastic utensils. No dice on kitchenware in the new place. Seems like no big deal until you bring a salad for lunch and have to travel ten floors to pilfer a fork from the cafeteria. Who knew I would feel so sentimental about a drawer full of forks?  
The good news is that I can already tell that despite the dearth of free coffee and disposable flatware, the kitchen congeniality carries over, even to the government. Floormates will leave extra cake or cookies for communal consumption in the kitchen - a good sign about the folks that I'll be working near. On the whole, I feel extremely lucky to be in my new job, both because of the substantive work and the general atmosphere of the office. 

At my old office, just about a year ago (right after St. Patrick's Day), someone brought in a loaf of Irish soda bread and left it in the kitchen to share. The bread came from the Heidelberg Pastry Shoppe, a pretty well-known bakery in the DC area. It was addictively tasty. Specked with raisins and just barely sweet - you know, sweet enough to nearly curb a pastry craving, but not so sweet that you feel guilty for having two slices. I was so into to it, that at the end of the day, I peeled the ingredient sticker off the plastic bag that the bread came in so that I could try to recreate it. Then I promptly forgot about it until this year when I saw soda bread advertisements leading up to St. Patty's Day.

So I pulled out the old ingredient sticker and Googled some soda bread recipes. It turns out that there are basically two types of Irish soda bread - the traditional Irish style, which is not sweet and does not have caraway seeds or raisins, and the American version, which I described above. I definitely wanted to make the sweetened American version, the recipe for which is pretty standard. 
Making this bread is super simple, you just need to take care not to overwork the flour. Because the dough is very dry, it is tempting to overly work it. Gently work the dough bits together until it forms a ball - nothing further. There will still be some dry flour bits in the ball and probably a little leftover flour on your work surface. Refer to the photos for reference. 

Irish Soda Bread (American style)

3 cups unbleached, all-purpose flour
1 cup cake flour
1/4 cup sugar, plus sugar for sprinkling
1.5 tsp salt
1.5 tsp baking soda
1.5 tsp cream of tartar
1 tbs caraway seeds
4 tbs butter cold, plus 1 tbs for melting
1 cup raisins
1.5 cups buttermilk
1 egg

Preheat oven to 425 degrees. Sift or mix together all-purpose flour, cake flour, sugar, salt, baking soda, cream of tartar and caraway seeds. 

Add 4 tbs. butter with a pastry cutter or your fingers. Break up butter until all of the butter pieces are smaller than pea-sized. Once the butter is worked in, the mix will still be completely dry (so don't worry if you don't have "dough"). Add raisins. 

Whisk buttermilk and egg together in a separate bowl and then add to dry mix and stir very gently - just enough to incorporate the liquids. Dough will be lumpy pieces. Dump dough bits onto a clean, flat work surface. Using a bit of extra flour, gently roll and press the dough bits together until you have a ball. Again, do not heavily knead the dough. Just enough to get a ball. See the photos above for dough phases.

Once you have a ball, place the dough either on a flat pan or any oven-safe skillet at least 10" in diameter. Using a serrated knife, score the dough by cutting a shallow "X" across the top of the dough (see picture). Make sure cuts are no more than 1/2 inch deep (if you cut too deep, don't worry, you'll just have a big split in the top of the bread - mine was a little too deep).

Melt 1 tbs. of butter and brush across top of dough. Sprinkle buttered dough with sugar (for sprinkling, I like using turbinado or demarrara sugar, but plain sugar is fine). 

Bake dough at 425 degrees for 40-45 minutes. Top of bread likely will be fully browned after 30 or 35 minutes so place a piece of aluminum foil loosely over the top of the bread at that time. Test center of bread with a butter knife or your finger to make sure it is fully cooked. Center of the bread should be firm, and not mushy at all. 

Bread stores well in an airtight container at room temperature for several days (or freeze). 

Happy belated St. Patty's Day and here's hoping you have your own bit of good luck this week. 

Sunday, March 11, 2012

Corn & Chile Soup Made with Salsa Verde

In January of 2007, I took my first out-of-town trip with my now-husband, Travis. He was racing a Rock and Roll Marathon in Phoenix that conveniently fell during my law school winter break. I'd always wanted to visit Arizona, so I decided to tag along. A friend told us that while we were there we HAD to eat at a place called Richardson's, so on our last day we set out to have breakfast there. Because Travis was racing, we had been sticking to known quantities for most of our meals (understandably, you don't want to risk any stomach problems when you're about to run the length of a city). So I was really looking forward to getting an authentic Southwestern meal. 

As luck would have it, when we got to the restaurant, we discovered that Richardson's was closed during breakfast hours - briefly, my hopes of legit heuvos rancheros were dashed. (Though this was less disappointing than the time my parents and sister traveled from London to Paris for one day only, a Tuesday, to visit the Louvre. Painful news: the Louvre is closed on Tuesdays. That smarts.) 

But wait, hold the phone, right around the side of Richardson's was a promising place called Dick's Hideaway. The latter part of the name is no joke - we were unsure whether we were even entering a restaurant. I can't really remember how we found it, because there certainly wasn't a big sign (if any sign at all). It might have been that a staff member in Richardson's directed us over there (as you might have guessed from the names, the two establishments are related). What I do remember is indulging in a deliciously saucy egg dish loaded with green chiles and salsa verde. Mexican-style salsa verde is made from tomatillos, chiles, lime, onion and cilantro. I freaking love it. I could drink the stuff.  
If it were up to me, I would order in food from Arizona or New Mexico every day. And every day it would include loads of chiles and salsa verde. But that's not an option. So instead I try to incorporate these ingredients in my cooking when I can. Exhibit A: this corn & chile soup made with salsa verde. Ideally, I would have used a fresh, homemade salsa verde, but I couldn't find tomatillos, so I used a pre-made salsa from a jar. Make do with your resources; you should be able to find jarred salsa verde in any grocery store.

Be aware that this soup is pretty spicy. One jalapeno may not seem like much, but it goes a long way when it has time to stew in a soup. If you have a low tolerance for heat in your food, use half a jalapeno. Also (forgive me if this is obvious), ground chili powder is not the same as ground cayenne pepper. This recipe calls for chili powder, which is cayenne pepper blended with other spices to reduce the heat. If you only have ground cayenne pepper available, it's okay to substitute, but cut the amount in half. 

Corn & Chile Soup w/Salsa Verde

Makes 6 large servings

2 tbs olive oil
1 small onion, diced
1/2 red bell pepper, diced
1 jalapeno, diced as small as possible
4 cloves garlic, chopped or minced
2 tbs flour
2 14 oz cans corn (drained) or 28 oz frozen corn, 1 cup reserved
2 cans diced green chiles
2-3 roma tomatoes (or 1 beefsteak)
1/2 cup salsa verde
3 cups vegetable stock
1 cup milk
2 tsp cumin
2 tsp chili powder
salt & pepper

*Recommended: immersion blender.

Cook olive oil, diced onion, diced bell pepper and diced jalapeno in a large pot over medium heat for 10-15 minutes or until the onion and pepper start to soften. Add garlic and cook for another few minutes, stirring often. Feel free to add more olive oil if the veggies start to stick or the garlic is browning too quickly.

Add flour and stir. Add corn (remember to leave 1 cup reserved), tomatoes, green chiles, salsa verde, vegetable stock, milk, cumin, chili powder, salt and pepper. 

Increase heat and bring soup to a boil. Once boiling, reduce heat and simmer for 30 minutes, stirring occasionally. 

Using an immersion blender, slowly blend soup to the desired consistency. Add reserved corn and heat for another 5 to 10 minutes. Soup will keep well in the refrigerator for 4-5 days. Enjoy! And if you're ever in Phoenix, hit up Dick's Hideaway (or if you go to Richardson's, let me know what I missed).

Note: If you do not have an immersion blender, you can use a regular blender, but be sure to: a) let the soup cool down awhile (just make sure it's not steamy); and b) be prepared to blend the soup in batches since a normal blender won't hold this entire recipe. Another option is to not blend the soup. This soup was looking pretty darn delicious in advance of blending and I'm sure would be terrific served as such.

Tuesday, February 28, 2012

Espresso Fudge Cookies

My husband loves a good chocolate chip cookie. Loves. So for his birthday a few weeks ago, I decided to test out the New York Times chocolate chip cookie recipe. It is said to be the most decadent, heartstoppingly good chocolate chip cookie recipe out there (the recipe calls for a full two-and-a-half sticks of butter!). In short, I was underwhelmed. I mean, the cookies were ok - but nothing to write home about. In Jacques Torres' defense - not that he needs my defending - I didn't follow the recipe exactly. I skipped the full 24 hours chilling time and I didn't use the special chocolate disks that the recipe calls for. Recipes that leave no room for interpretation are not my kind of recipe, I suppose.
We had some friends over and I offered up the NYT cookies. People will eat anything you put in front of them, so of course they got eaten. But my friend Laurel brought another kind of cookie, a chocolaty, fudgy, half-cooked-brownie-type of cookie (don't even pretend that you don't like your brownies half-cooked). I can't remember the last time I had a better cookie. She brought them over fresh out of the oven (hallelujah!), but they're still amazing once fully cooled. They were a perfect dessert to serve with red wine.

It turned out the recipe was from the America's Test Kitchen Baking Illustrated cookbook (which coincidentally, Laurel had given us as a wedding gift). So after I gushed over the cookies like they were a newborn child, she walked me over to the cookbook and tabbed the recipe. And for the love of Shared Bites, I was able to recreate them. Just like I like my recipes, this one is still delish even if you have to improvise a little. For example, Laurel skipped the espresso - no prob (I had some espresso left over from the Brownie Affogato, so I used it). I mixed a random assortment of chocolates to come up with the requisite measurement - still perfecto. The recipe calls for semi-sweet chocolate, but please take liberties and use whatever chocolate bits you have around your house.
Espresso Fudge Cookies
"Thick and Chewy Double Chocolate Cookies" recipe from Baking Illustrated

Makes 35-40 cookies

2 cups unbleached, all-purpose flour
1/2 cup cocoa powder
2 tsp baking powder
1/2 tsp salt
16 oz semi-sweet chocolate, in pieces or chips
4 large eggs
2 tsp vanilla extract
2 tsp instant coffee or espresso powder
10 tbsp (1-1/4 sticks) unsalted butter, softened
1-1/2 cups packed brown sugar
1/2 cup sugar

Mix together flour, cocoa, baking powder and salt. In a separate bowl, gently whisk the eggs with the vanilla and sprinkle the espresso powder over the eggs; set aside. 

Melt chocolate in a double boiler on the stove. If you don't have a double boiler, melt chocolate in a large bowl resting in a pot filled with 1 inch of simmering water. Stir occasionally and melt until smooth; remove from heat.

Using an electric mixer, mix butter, brown sugar and sugar for about 45 seconds at a medium speed. Mixture will remain grainy. Reduce speed and beat in egg mixture. Add chocolate and beat until combined. Scrape sides down. Add dry ingredients and mix until just combined. Use spatula to make sure all chocolate is combined (it has a tendency to pool at the bottom).

Cover with plastic wrap and let cookie dough sit for 30 minutes.

Heat oven to 350 degrees. Scoop golf-ball sized mounds of dough onto cookie sheets lined with silpats or parchment paper. Cookies will spread so leave around 2 inches between each cookie. Bake at 350 for 9-10 minutes. Centers will remain very soft. Serve warm.

Friday, December 23, 2011

Two-berry Pie and Adventures in Frying

Just before Thanksgiving, I read an article on Huffington Post called "Five reasons not to fry a turkey." As you might imagine, the reasons were all safety related (no one ever says skip the fryer because it doesn't taste as good). I relayed the warnings to my husband who was waffling between frying a turkey and making a turducken (which is not to say I was pushing for the turducken, I just felt VERY nervous about frying a turkey). Travis was undeterred. He had decided to fry a turkey and didn't have a shred of concern that our house, dog, lawn, etc. might go up in flames. I suppose for the same reason that I am unfailingly confident in my ability to put together any piece of Ikea furniture, no matter the size or complexity, with only the help of that little 2D marshmallow man making hand signals. Sometimes people just feel invincible.

This year we decided to host Thanksgiving at our house with a few friends - our first official T-day as hosts. In addition the fried turkey de rรฉsistence, we had honey ham & poblano macaroni and cheese, homemade mashed potatoes, stuffing, gravy, cranberry salsa, roasted sweet potatoes with peppers and onions, salad with candied walnuts, blue cheese and cranberries, and green beans with french fried onions (Thanksgiving is not complete without french fried onions). We had just five adults for dinner, but I think we made enough food to feed our entire block, including pets and loiterers. Though I can't think of a single dish that I could have done without.  
For dessert, we joined forces with a bunch of friends who were hosting their own Thanksgivings for visiting families. For me, Thanksgiving dessert is about pie. Pie at least three ways. Since others were bringing pumpkin pie and apple desserts, I decided on a berry pie. My Aunt Mary Ellen makes this wickedly delicious grape pie, but I think it's pretty complicated and I already had a lot going on in the kitchen. (I know, grape pie, it sounds weird, right? But it's made with concord grapes and is perfectly sweet and tart and rich all at the same time. Someday, I'll make you a believer.) Berry pie is the opposite of complicated. It's like "hi, I'm the easiest pie since ever." Especially when you cheat and use a crust mix.

When I first started blogging, I felt like I had to make everything from scratch (in fact, my very first blog recipe was an apple pie that included a scratch crust). But I got over that quickly. And wouldn't you know, my most popular post is the mint oreo cupcakes that came from a box (I recently learned that a woman made them for her wedding!! To that woman: I am so flattered and hope they were a hit.). So to my fellow bakers who appreciate a shortcut, enter boxed pie crust. You just add water and roll out. And I swear on my mother, it's as good as any pie crust you can make from scratch.
With the time I saved making pie crust, I made a beautiful lattice top. In terms of wow factor, you get a lot more bang for your buck with a lattice top than a scratch crust. The rolling pastry cutter pictured above was super quick and easy to use, but certainly not necessary (one option available here). If you don't have a pastry cutter, just use a pizza cutter.

And now to recap our Thanksgiving festivities (even though we're two days shy of Christmas at this point) . . . 

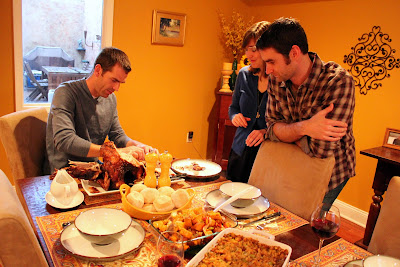
Inside, the fire was going and the table was set.
Outside, we were putting on a minor spectacle in our yard. How often do you walk by an industrial-sized fryer bubbling away in your neighbor's yard, while they lounge around watching it like a television set? Oh, never? Weird.
The removal of the bird from 35 lbs. of 350 degree oil was definitely most exciting part. I'm happy to report that no limbs were lost and no skin grafts were required as a result. Though there may have been some casualties in the way of shrubs.
He's like a surgeon.
Back in the mines, we finished up our sides. In case you were wondering, it in fact takes three educated adults to transfer sweet potatoes from one ceramic dish to another, plus one to photo-document.
The anticipation! You can't see it, but Jenny is actually tearing up.
And finally, closing the holiday with the expanded team.

Two-berry Pie

1 pie crust recipe for a 2-crust pie (this recipe or this shortcut)
4 cups raspberries and/or blackberries (4 of the smallest plastic containers or 2 pint-sized containers)
2/3 cup sugar plus sugar for sprinkling

1/8 tsp. salt
1/4 cup cornstarch
1 tablespoon lemon juice
2 tbsp. butter, cut into chunks
2 tbsp. milk or cream

Prepare pie crust and divide into two sections (one slightly larger chunk of pie dough for the bottom crust and a smaller section for the top crust; 60%/40%). Wrap the smaller section tightly in plastic wrap and set in the refrigerator. Roll out larger section into a circle and place in your pie pan. Cover loosely with a damp paper towel to keep from drying out.

Mix together sugar, salt and cornstarch. Toss berries gently in sugar/cornstarch mix. Add lemon juice. Spread berry mix into pie crust. Place butter chunks evenly over berry mix.

Preheat oven to 425 degrees.

Remove reserved pie crust and roll into a circle. Place second crust over berries and roll the edges inwards, sealing the top and bottom crusts together. (Or try your hand at the lattice.) If using a full top crust, make 4-8 slits in the crust to allow steam to escape. Brush milk or cream over the top crust and sprinkle generously with sugar.

Bake at 425 for 15 minutes. Reduce oven temperature to 375 and bake for another 25 minutes. Check pie with 10-15 minutes remaining to see if crust is fully browned. If so, place a piece of aluminum foil over top of the pie for the remainder of baking time.

Note: My pie came out with some extra liquid bubbling up. One nice feature of a lattice crust is that you can pour the extra liquid out once the pie cools.

Monday, October 10, 2011

Whole Wheat Pumpkin Bread w/ Maple Cinnamon Glaze

Sigh. This past weekend was about as good as they come. It was three days long, the weather was UH-mazing, and my usual haunts were crawling with pumpkins. I freaking love pumpkins. I want to buy a thousand of them and cover my yard with the orange beauties so that everyone walking by can taste the fall in the air and feel flashes of subconscious nostalgia for trick-or-treating as a kid. Halloween is my favorite holiday (as evidenced here), despite the painful memories of the year that I had a short haircut and my parents dressed me as a skeleton and all of our neighbors thought I was boy. I was 7; it left scars.

But back to the present. I spent Saturday gloriously baking and cleaning and walking my pup. She and I took a stroll over to Eastern Market to pick up some home-grown yellow tomatoes and basil (which later came together in a super-fresh pasta dish with a little olive oil and cherry peppers). I can't say it enough, but the weather was so good. I'll say it a million times to show the weather gods how much I appreciated it. Hot weather that runs into October is what gets me through those garbage months later on (I should probably just move to Arizona and be done with it). So I was strolling along, loving the heat and loving my dog and just loving life. Then I see what I can only describe as a heartstoppingly beautiful pumpkin. Charlie Brown would have died. So I bagged it up and lugged it home (seriously lugged - between the tomatoes and pumpkins and dog, getting home took all my energy and coordination).
I had the perfect pumpkin centerpiece. Then it was on to the perfect pumpkin dessert. I looked at gobs of recipes for pumpkin bread before crafting my own. The most popular recipe floating around the internet calls for 1-1/2 cups of sugar per loaf. Now, I clearly am not one who shies away from using sugar. I bake sweet treats like it's my j-o-b. But, as I've said before, there's no point in putting boatloads of sugar in a baked good where you don't need it. I would wager that if you pitted my recipe (3/4 cups of sugar and 3/4 cups unsweetened applesauce) against a recipe with 1-1/2 cups of sugar, mine would win. And even if it didn't win (though this is doubtful), it wouldn't be because of the missing sugar. Save your sugs for when they really count.
This recipe produces a moist, dense quick bread. Not something airy or crusty or crumbly. "Quick bread" is a catch-all term for breads that don't use yeast to rise (and hence are more like your typical baked good than actual bread). E.g., banana bread, corn bread, zucchini bread, soda bread, biscuits. I wanted something so moist that it's almost mushy on the inside - just like the banana bread that my mom used to make when I was a kid. 

The whole wheat was an experiment. I used half whole wheat and half all-purpose, but you wouldn't even know it was part whole wheat. Next time, I'll go whole hog on the whole wheat and see what happens. In the meantime, don't hesitate to try this recipe - which is tasty-central - or to experiment with your own ideal pumpkin bread recipe!

Whole Wheat Pumpkin Bread w/Maple Cinnamon Glaze 

Makes one loaf

Pumpkin Bread
1 cup whole wheat flour
1 cup unbleached all-purpose flour
1 tsp. baking powder
1/2 tsp. baking soda
1/2 tsp. cinnamon
1/2 tsp. ground cloves
1/2 tsp. nutmeg
1/2 tsp. salt
1-1/4 cups canned pumpkin
2 eggs
3/4 cups packed brown sugar
3/4 cups unsweetened applesauce
3/4 cups vegetable oil 

Glaze
2 tbsp. low-fat cream cheese (same as neufchรขtel), room temperature
2 tbsp. pure maple syrup
pinch cinnamon

This recipe is easy peasy. Heat oven to 350 degrees. Mix your dry ingredients - the first 8 ingredients, not including the brown sugar (brown sugar is sticky and won't distribute evenly when put directly in dry ingredients). Mix together wet ingredients plus brown sugar. Add dry to wet, mixing just enough to incorporate. Pour batter into a greased loaf pan (or a pan lined with parchment paper that hangs over the edge on two sides for easy removal). Bake at 350 for 50-55 minutes. Top should be just starting brown at the crevice (there's always a crevice in quick breads) and a toothpick should come out clean. I baked for exactly 55 minutes.

While bread cools (for 15-20 minutes), whisk together cream cheese, maple syrup and a few good shakes of cinnamon. Make sure cream cheese is at room temperature, otherwise it won't incorporate with the syrup very well. While bread is still warm, pour the glaze down the center of the bread and spread to edges gently with a spatula. 

Garnish with your favorite decorative pumpkins.
Related Posts Plugin for WordPress, Blogger...